A brief and hopefully to the point on getting up and running with OpenGL in an Ubuntu Linux environment. For setting up OpenGL in Windows / Visual Studio environments, please see this post. My choice of integrated development environment for C++ development for this example is Netbeans 7.3. An excellent guide for setting up OpenGL in Linux environments can be found on this CodeProject article, which I found to particularly useful, and from which I have heavily borrowed here.
To quote from Mark Sinnathamby, “OpenGL is a platform independent graphics API, and freeglut is the successor of the OpenGL Utility Toolkit (GLUT) which enables a generic approach to creating and handling windows and other functions in different platforms.”
1. Ensure all pre-requisites have been installed
If a graphics card is being used, first ensure all necessary drivers have been installed. Please see this link. I found that I was able to skip this step.
2. Install OpenGL and freeglut
Open up a terminal window and simply enter the following apt-get install commands:
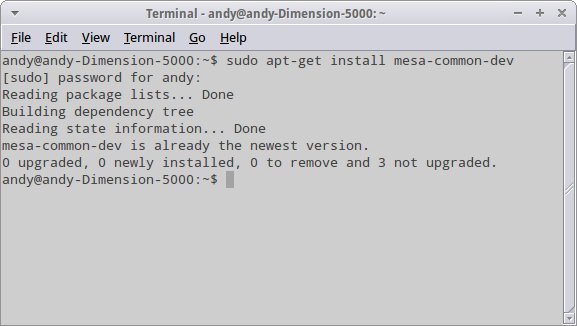
$ sudo apt-get install mesa-common-dev

$ sudo apt-get install freeglut3-dev
If either of these packages are already present and correct, the kernel will give a message telling you the latest packages are already installed:
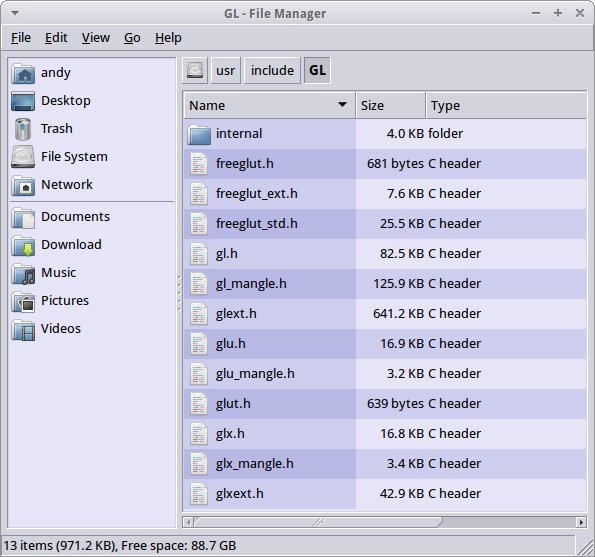
All being well, the following OpenGL files will be visible inside your /usr/include/GL directory:
3. Set your C++ IDE
For the purpose of this discussion, Netbeans 7.3 is the choice of IDE being used here. Create a new C++ application and set the application project properties. Right-click the project folder and select Properties.
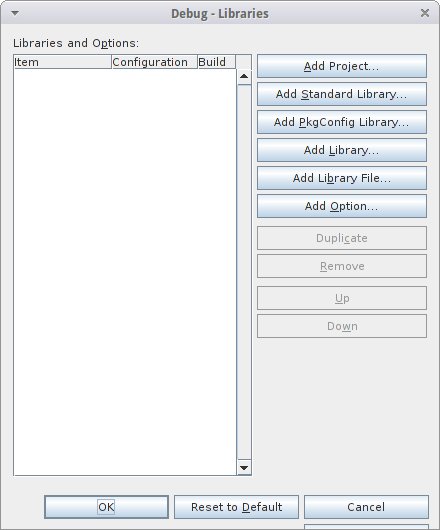
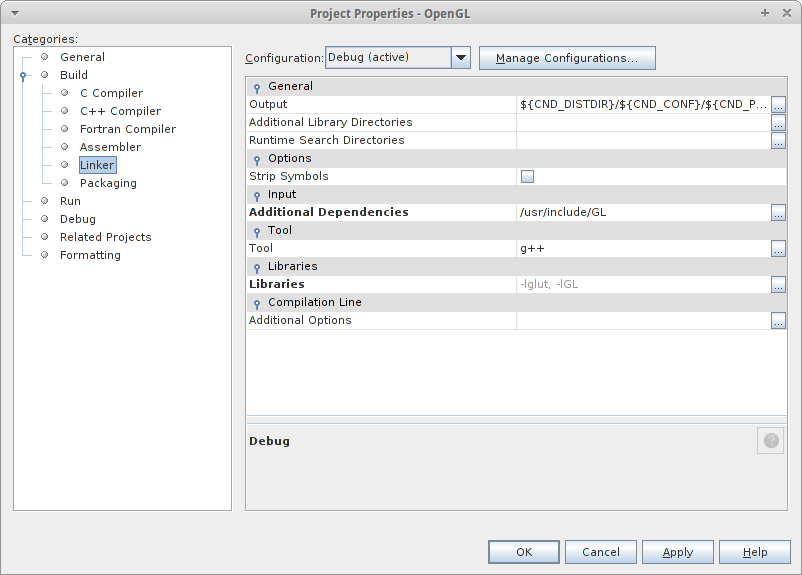
In the properties window that appears, in the ‘Build’ category, select the ‘Linker’ option, and set the following variables in order to make our simple example compile correctly:
In ‘Additional Library Directories’, set the value to the folder location where your OpenGL was installed, for example /usr/include/GL
In ‘Libraries’ select the ‘Add Option’ button from the dialog that appears
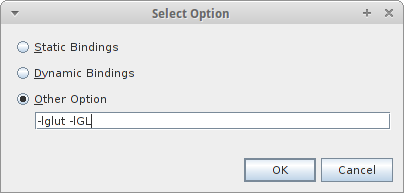
And in the ‘Select Option’ dialog that then appears, select the ‘Other Option’ radio button, and set the text value to -lglut -lGL:
Giving you the following Properties setup (click to enlarge):
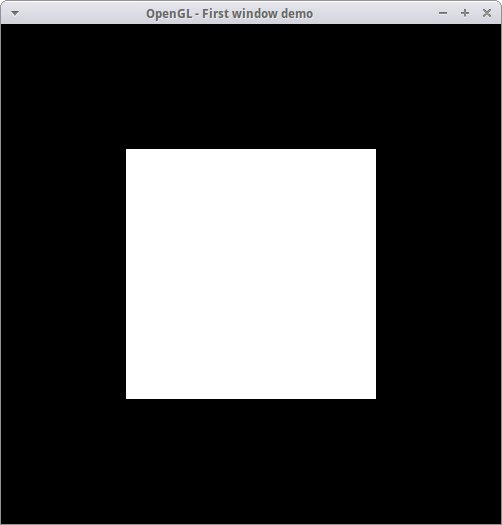
4. Try a simple example: a demo window containing a square
#include <GL/freeglut.h>
#include <GL/gl.h>

/* display function - code from:
     http://fly.cc.fer.hr/~unreal/theredbook/chapter01.html
This is the actual usage of the OpenGL library.
The following code is the same for any platform */
void renderFunction()
{
    glClearColor(0.0, 0.0, 0.0, 0.0);
    glClear(GL_COLOR_BUFFER_BIT);
    glColor3f(1.0, 1.0, 1.0);
    glOrtho(-1.0, 1.0, -1.0, 1.0, -1.0, 1.0);
    glBegin(GL_POLYGON);
        glVertex2f(-0.5, -0.5);
        glVertex2f(-0.5, 0.5);
        glVertex2f(0.5, 0.5);
        glVertex2f(0.5, -0.5);
    glEnd();
    glFlush();
}

// Main method - main entry point of application
// the freeglut library does the window creation work for us,
// regardless of the platform.

int main( int argc, char** argv )
{
    glutInit( &argc, argv );
    glutInitDisplayMode( GLUT_SINGLE );
    glutInitWindowSize( 500,500 );
    glutInitWindowPosition( 100, 100 );
    glutCreateWindow( "OpenGL - First window demo" );
    glutDisplayFunc( renderFunction );
    glutMainLoop();
    return 0;
}
Which exercises some of the OpenGL functionality for window creation, sizing, labelling, positioning etc:
5. Some possible gotchas and compilation problems when using OpenGL in Linux, and how to fix them
When starting some OpenGL examples in Linux, you may come across these kinds of error messages when trying to compile:
Problem: Unable to find a header file
fatal error: glut.h: No such file or directory
Solution:
Add the /usr/include/GL path to the additional include directories.
Problem: Error messages similar to the following when compiling:
'fatal error: GL/glew.h: No such file or directory'
'fatal error: GL/glfw.h: No such file or directory'
'fatal error: GL/glm.h: No such file or directory'
Solution: This means that the said {GLEW, GLFW, GLM} library is not installed.
At the Linux command prompt type:
$ sudo apt-get install libglfw-dev libglm-dev libglew1.6-dev
… to install all of these libraries.
Problem: ‘Undefined reference’ type error messages
Examples:
undefined reference to `glfwInit'
undefined reference to `glewExperimental'
undefined reference to `gluPerspective'
Solution:
Ensure that the compilation line contains the appropriate link. The clue to which link is in the error itself eg ‘glfw’, ‘GLEW’ etc.
For undefined reference to `glfwInit’ use:
-lglfw
For undefined reference to `glewExperimental’ use:
-lGLEW
For undefined reference to `gluPerspective’ use:
-lGLU
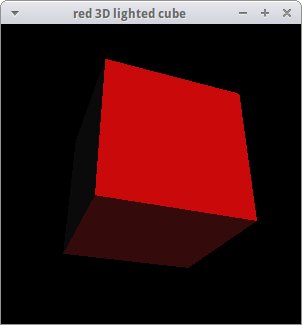
6. The Cube Example
When you are free of the compilation errors listed above, you should then be in a position to try out the 3D Cube example, as also described in the OpenGL for Windows example. Here is the Linux C++ code, which is not much different from the Windows code:
#include <glut.h>

GLfloat light_diffuse[]  = {1.0, 0.0, 0.0, 1.0};  /* Red diffuse light. */
GLfloat light_position[] = {1.0, 1.0, 1.0, 0.0};  /* Infinite light location. */

GLfloat n[6][3] = {  /* Normals for the 6 faces of a cube. */
                     { -1.0, 0.0,  0.0 },
                     { 0.0,  1.0,  0.0 },
                     { 1.0,  0.0,  0.0 },
                     { 0.0, -1.0,  0.0 },
                     { 0.0,  0.0,  1.0 },
                     { 0.0,  0.0, -1.0 }  };

GLint faces[6][4] = {  /* Vertex indices for the 6 faces of a cube. */
                      {0, 1, 2, 3},
                      {3, 2, 6, 7},
                      {7, 6, 5, 4},
                      {4, 5, 1, 0},
                      {5, 6, 2, 1},
                      {7, 4, 0, 3}  };

GLfloat v[8][3];  /* Will be filled in with X,Y,Z vertexes. */

void drawBox(void)
{
   int i;

   for (i = 0; i < 6; i++)
   {
     glBegin(GL_QUADS);
     glNormal3fv(&n[i][0]);
     glVertex3fv(&v[faces[i][0]][0]);
     glVertex3fv(&v[faces[i][1]][0]);
     glVertex3fv(&v[faces[i][2]][0]);
     glVertex3fv(&v[faces[i][3]][0]);
     glEnd();
   }
}

void display(void)
{
   glClear( GL_COLOR_BUFFER_BIT | GL_DEPTH_BUFFER_BIT );
   drawBox();
   glutSwapBuffers();
}

void init(void)
{
   /* Setup cube vertex data. */
   v[0][0] = v[1][0] = v[2][0] = v[3][0] = -1;
   v[4][0] = v[5][0] = v[6][0] = v[7][0] = 1;
   v[0][1] = v[1][1] = v[4][1] = v[5][1] = -1;
   v[2][1] = v[3][1] = v[6][1] = v[7][1] = 1;
   v[0][2] = v[3][2] = v[4][2] = v[7][2] = 1;
   v[1][2] = v[2][2] = v[5][2] = v[6][2] = -1;

   /* Enable a single OpenGL light. */
   glLightfv(GL_LIGHT0, GL_DIFFUSE, light_diffuse);
   glLightfv(GL_LIGHT0, GL_POSITION, light_position);
   glEnable(GL_LIGHT0);
   glEnable(GL_LIGHTING);

   /* Use depth buffering for hidden surface elimination. */
   glEnable(GL_DEPTH_TEST);

   /* Setup the view of the cube. */
   glMatrixMode(GL_PROJECTION);
   gluPerspective( /* field of view in degree */ 40.0,
                   /* aspect ratio */ 1.0,
                   /* Z near */ 1.0,
                   /* Z far */ 10.0 );

   glMatrixMode( GL_MODELVIEW );
   gluLookAt( 0.0, 0.0, 5.0,  /* eye is at (0,0,5) */
              0.0, 0.0, 0.0,  /* center is at (0,0,0) */
              0.0, 1.0, 0.);  /* up is in positive Y direction */

   /* Adjust cube position to be asthetic angle. */
   glTranslatef(0.0, 0.0, -1.0);
   glRotatef(60, 1.0, 0.0, 0.0);
   glRotatef(-20, 0.0, 0.0, 1.0);
}

int main(int argc, char **argv)
{
   glutInit(&argc, argv);
   glutInitDisplayMode(GLUT_DOUBLE | GLUT_RGB | GLUT_DEPTH);
   glutCreateWindow("red 3D lighted cube");
   glutDisplayFunc(display);
   init();
   glutMainLoop();

   return 0;
}
When running this you should get the cube picture:
Related link