As discussed on a StackOverflow post, this is considered bad practice, so only use this when necessary.
Step 1: Create a new WPF project
Step 2: Add event handling code
A number of classes are needed for doing command bindings in MVVM.
Create the following classes and add to your Visual Studio project:
RelayCommand.cs
using System;
using System.Windows.Input;

namespace SupervisorControllingPattern
{
   public class RelayCommand<T> : ICommand
   {
      private readonly Predicate<T> _canExecute;
      private readonly Action<T> _execute;

      public RelayCommand(Action<T> execute)
         : this(execute, null)
      {
         _execute = execute;
      }

      public RelayCommand(Action<T> execute, Predicate<T> canExecute)
      {
         if (execute == null)
            throw new ArgumentNullException(nameof(execute));
         _execute = execute;
         _canExecute = canExecute;
      }

      public bool CanExecute(object parameter)
      {
         return (_canExecute == null) || _canExecute((T) parameter);
      }

      public void Execute(object parameter)
      {
         _execute((T) parameter);
      }

      public event EventHandler CanExecuteChanged
      {
         add { CommandManager.RequerySuggested += value; }
         remove { CommandManager.RequerySuggested -= value; }
      }
   }

   public class RelayCommand : ICommand
   {
      private readonly Predicate<object> _canExecute;
      private readonly Action<object> _execute;

      public RelayCommand(Action<object> execute)
         : this(execute, null)
      {
         _execute = execute;
      }

      public RelayCommand(Action<object> execute, Predicate<object> canExecute)
      {
         if (execute == null)
            throw new ArgumentNullException(nameof(execute));
         _execute = execute;
         _canExecute = canExecute;
      }

      public bool CanExecute(object parameter)
      {
         return (_canExecute == null) || _canExecute(parameter);
      }

      public void Execute(object parameter)
      {
         _execute(parameter);
      }

      // Ensures WPF commanding infrastructure asks all RelayCommand objects whether their
      // associated views should be enabled whenever a command is invoked
      public event EventHandler CanExecuteChanged
      {
         add
         {
            CommandManager.RequerySuggested += value;
            CanExecuteChangedInternal += value;
         }
         remove
         {
            CommandManager.RequerySuggested -= value;
            CanExecuteChangedInternal -= value;
         }
      }

      private event EventHandler CanExecuteChangedInternal;

      public void RaiseCanExecuteChanged()
      {
         CanExecuteChangedInternal.Raise(this);
      }
   }
}
EventRaiser.cs
using System;

namespace SupervisorControllingPattern
{
   public static class EventRaiser
   {
      public static void Raise(this EventHandler handler, object sender)
      {
         handler?.Invoke(sender, EventArgs.Empty);
      }

      public static void Raise<T>(this EventHandler<EventArgs<T>> handler, object sender, T value)
      {
         if (handler == null) throw new ArgumentNullException(nameof(handler));
         handler(sender, new EventArgs<T>(value));
      }

      public static void Raise<T>(this EventHandler<T> handler, object sender, T value) where T : EventArgs
      {
         handler?.Invoke(sender, value);
      }

      public static void Raise<T>(this EventHandler<EventArgs<T>> handler, object sender, EventArgs<T> value)
      {
         handler?.Invoke(sender, value);
      }
   }
}
EventArgs.cs
using System;

namespace SupervisorControllingPattern
{
   public class EventArgs<T> : EventArgs
   {
      public EventArgs(T value)
      {
         Value = value;
      }

      public T Value { get; private set; }
   }
}
Step 3: Create an example View
In this example, I use the MainWindow.xaml to showcase how a point can be plotted on a canvas after the user has pressed a button.
MainWindow.xaml
<Window x:Class="SupervisorControllingPattern.MainWindow"
        xmlns="http://schemas.microsoft.com/winfx/2006/xaml/presentation"
        xmlns:x="http://schemas.microsoft.com/winfx/2006/xaml"
        xmlns:d="http://schemas.microsoft.com/expression/blend/2008"
        xmlns:mc="http://schemas.openxmlformats.org/markup-compatibility/2006"
        xmlns:supervisorControllingPattern="clr-namespace:SupervisorControllingPattern"
        mc:Ignorable="d"
        Title="MainWindow" Height="350" Width="525">

    <Window.DataContext>
        <supervisorControllingPattern:MainWindowViewModel />
    </Window.DataContext>

    <Grid>
        <Grid.RowDefinitions>
            <RowDefinition Height="40" />
            <RowDefinition Height="*" />
        </Grid.RowDefinitions>

        <Button
            Height="35" Width="90"
            Command="{Binding Plot}"
            Content="Plot" />

        <Canvas
            Grid.Row="1"
            Name="CanvasPlot"
            Width="490"
            Height="300">
        </Canvas>
    </Grid>
</Window>
Step 4: Create the ViewModel class
As used in the MVVM pattern…
Add property of type IMainWindow to your View Model
MainWindowViewModel.cs
using System.Windows.Input;

namespace SupervisorControllingPattern
{
   public class MainWindowViewModel
   {
      private ICommand _command;
      public IMainWindow MainWindow { get; set; }

      public ICommand Plot
      {
         get
         {
            return _command ?? (_command = new RelayCommand(
                      x => { PlotPoint(); }));
         }
      }

      public void PlotPoint()
      {
         MainWindow?.PlotPoint();
      }
   }
}
Step 5: Implement the Supervisor Controller Pattern
Define the interface in which the ViewModel communicates with the View with the required method(s):
IMainWindow.cs
namespace SupervisorControllingPattern
{
   public interface IMainWindow
   {
      void PlotPoint();
   }
}
Inherit code behind the View class from your interface and implement method defined in the interface (te MainWindow class in this example).
Also set the View property on the View Model to an instance of View as IMainWindow
e.g. in code behind DataContext.MainWindow= this;
MainWindow.xaml.cs
using System.Windows.Controls;
using System.Windows.Media;
using System.Windows.Shapes;

namespace SupervisorControllingPattern
{
   /// <summary>
   ///    Interaction logic for MainWindow.xaml
   /// </summary>
   public partial class MainWindow : IMainWindow
   {
      public MainWindow()
      {
         InitializeComponent();

         var mainWindowViewModel = DataContext as MainWindowViewModel;

         if (mainWindowViewModel != null)
            mainWindowViewModel.MainWindow = this;
      }

      public void PlotPoint()
      {
         var ellipse = new Ellipse
         {
            Width = 10,
            Height = 10,
            Fill = Brushes.Blue
         };

         var left = CanvasPlot.ActualWidth/2;
         var top = CanvasPlot.ActualHeight/2;

         Canvas.SetLeft(ellipse, left);
         Canvas.SetTop(ellipse, top - 40);

         CanvasPlot.Children.Add(ellipse);
      }
   }
}
Step 6: Try it!
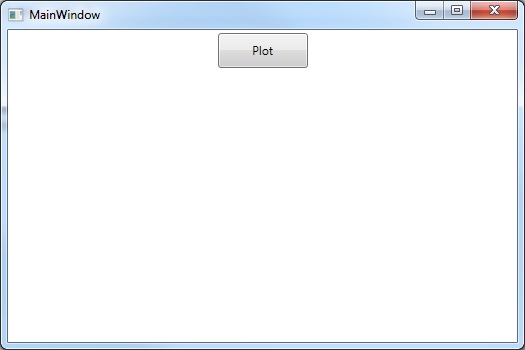
On initial start up window looks as follows:
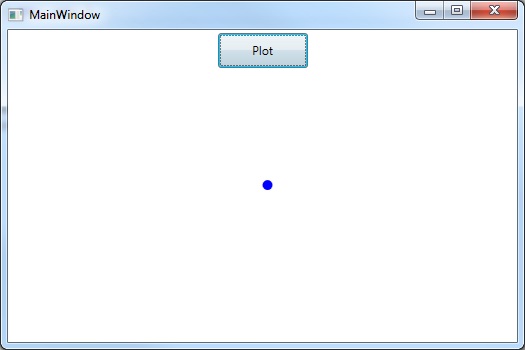
On pressing the button the event is handled and the point is plotted: