A post describing how to utilise Appccelerate as a means of employing a state machine in your MVVM / WPF application.
Implementing state machines using the state pattern can lead to complicated code. A state machine software component that allows us to implement a state machine as a single class is a significant step towards maintaining clean code, reducing complexity and effort. Hopefully this article demonstrates this.
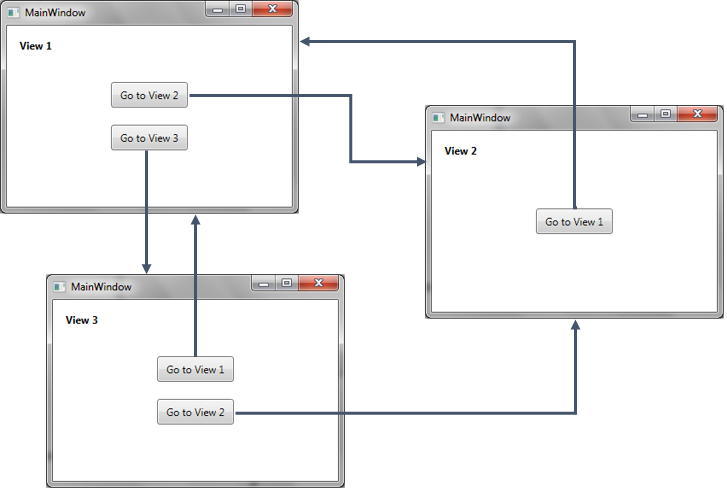
This example seeks to utilise Appccelerate state machine as a means of navigating between XAML views in a WPF application employing the MVVM (Model View ViewModel) pattern. In our example we wish to be able to navigate between three WPF screens (user controls) in the manner described by the following state diagram:
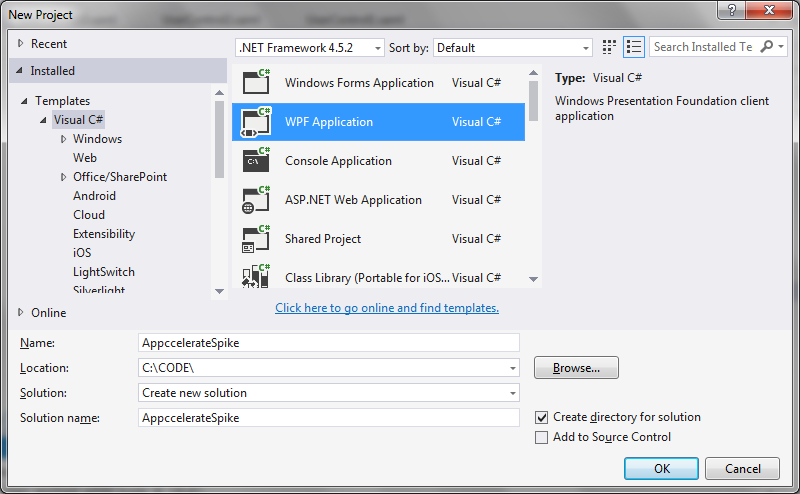
Step 1: Create a new WPF application
Step 2: Create the event handling classes
RelayCommand.cs
using System;
using System.Windows.Input;

public class RelayCommand<T> : ICommand
{
   private readonly Predicate<T> _canExecute;
   private readonly Action<T> _execute;

   public RelayCommand(Action<T> execute)
      : this(execute, null)
   {
      _execute = execute;
   }

   public RelayCommand(Action<T> execute, Predicate<T> canExecute)
   {
      if (execute == null)
      {
         throw new ArgumentNullException("execute");
      }
      _execute = execute;
      _canExecute = canExecute;
   }

   public bool CanExecute(object parameter)
   {
      return _canExecute == null || _canExecute((T)parameter);
   }

   public void Execute(object parameter)
   {
      _execute((T)parameter);
   }

   public event EventHandler CanExecuteChanged
   {
      add { CommandManager.RequerySuggested += value; }
      remove { CommandManager.RequerySuggested -= value; }
   }
}

public class RelayCommand : ICommand
{
   private readonly Predicate<object> _canExecute;
   private readonly Action<object> _execute;

   public RelayCommand(Action<object> execute)
      : this(execute, null)
   {
      _execute = execute;
   }

   public RelayCommand(Action<object> execute, Predicate<object> canExecute)
   {
      if (execute == null)
      {
         throw new ArgumentNullException("execute");
      }
      _execute = execute;
      _canExecute = canExecute;
   }

   public bool CanExecute(object parameter)
   {
      return _canExecute == null || _canExecute(parameter);
   }

   public void Execute(object parameter)
   {
      _execute(parameter);
   }

   // Ensures WPF commanding infrastructure asks all RelayCommand objects whether their
   // associated views should be enabled whenever a command is invoked
   public event EventHandler CanExecuteChanged
   {
      add
      {
         CommandManager.RequerySuggested += value;
         CanExecuteChangedInternal += value;
      }
      remove
      {
         CommandManager.RequerySuggested -= value;
         CanExecuteChangedInternal -= value;
      }
   }

   private event EventHandler CanExecuteChangedInternal;

   public void RaiseCanExecuteChanged()
   {
      CanExecuteChangedInternal.Raise(this);
   }
}
EventRaiser.cs
using System;

public static class EventRaiser
{
   public static void Raise(this EventHandler handler, object sender)
   {
      handler?.Invoke(sender, EventArgs.Empty);
   }

   public static void Raise<T>(this EventHandler<EventArgs<T>> handler, object sender, T value)
   {
      handler?.Invoke(sender, new EventArgs<T>(value));
   }

   public static void Raise<T>(this EventHandler<T> handler, object sender, T value) where T : EventArgs
   {
      handler?.Invoke(sender, value);
   }

   public static void Raise<T>(this EventHandler<EventArgs<T>> handler, object sender, EventArgs<T> value)
   {
      handler?.Invoke(sender, value);
   }
}
EventArgs.cs
using System;

public class EventArgs<T> : EventArgs
{
   public EventArgs(T value)
   {
      Value = value;
   }

   public T Value { get; private set; }
}
Step 3: Set the Views
MainWindow.xaml
In order to switch between different views, the main window uses a ContentControl to select what the
current page ViewModel is. More on this later.
<Window x:Class="AppccelerateSpike.MainWindow"
        xmlns="http://schemas.microsoft.com/winfx/2006/xaml/presentation"
        xmlns:x="http://schemas.microsoft.com/winfx/2006/xaml"
        xmlns:d="http://schemas.microsoft.com/expression/blend/2008"
        xmlns:mc="http://schemas.openxmlformats.org/markup-compatibility/2006"
        xmlns:local="clr-namespace:AppccelerateSpike"
        mc:Ignorable="d"
        Title="MainWindow"
        Height="250" Width="350">

    <Grid>
        <ContentControl Content="{Binding CurrentPageViewModel}" />
    </Grid>
</Window>
And then the individual windows we want to navigate between:
UserControl1.xaml
<UserControl x:Class="AppccelerateSpike.UserControl1"
             xmlns="http://schemas.microsoft.com/winfx/2006/xaml/presentation"
             xmlns:x="http://schemas.microsoft.com/winfx/2006/xaml"
             xmlns:mc="http://schemas.openxmlformats.org/markup-compatibility/2006"
             xmlns:d="http://schemas.microsoft.com/expression/blend/2008"
             xmlns:local="clr-namespace:AppccelerateSpike"
             mc:Ignorable="d"
             d:DesignHeight="300" d:DesignWidth="300">

    <Grid>
        <Label
            FontWeight="Bold"
            Margin="10,10,0,0" Content="View 1" />
        <StackPanel VerticalAlignment="Center">
            <Button
                Content="Go to View 2"
                Command="{Binding GoTo2}"
                Width="90" Height="30"
                Margin="0, 0, 0, 20"/>

            <Button
                Content="Go to View 3"
                Command="{Binding GoTo3}"
                Width="90" Height="30" />

        </StackPanel>
    </Grid>

</UserControl>
UserControl2.xaml
<UserControl x:Class="AppccelerateSpike.UserControl2"
             xmlns="http://schemas.microsoft.com/winfx/2006/xaml/presentation"
             xmlns:x="http://schemas.microsoft.com/winfx/2006/xaml"
             xmlns:mc="http://schemas.openxmlformats.org/markup-compatibility/2006"
             xmlns:d="http://schemas.microsoft.com/expression/blend/2008"
             xmlns:local="clr-namespace:AppccelerateSpike"
             mc:Ignorable="d"
             d:DesignHeight="300" d:DesignWidth="300">

    <Grid>
        <Label
            FontWeight="Bold"
            Margin="10,10,0,0" Content="View 2" />
        <Button
            Content="Go to View 1"
            Command="{Binding GoTo1}"
            Width="90" Height="30" />
    </Grid>

</UserControl>
UserControl3.xaml
<UserControl x:Class="AppccelerateSpike.UserControl3"
             xmlns="http://schemas.microsoft.com/winfx/2006/xaml/presentation"
             xmlns:x="http://schemas.microsoft.com/winfx/2006/xaml"
             xmlns:mc="http://schemas.openxmlformats.org/markup-compatibility/2006"
             xmlns:d="http://schemas.microsoft.com/expression/blend/2008"
             xmlns:local="clr-namespace:AppccelerateSpike"
             mc:Ignorable="d"
             d:DesignHeight="300" d:DesignWidth="300">
    <Grid>
        <Label
            FontWeight="Bold"
            Margin="10,10,0,0" Content="View 3" />
        <StackPanel VerticalAlignment="Center">
            <Button
                Content="Go to View 1"
                Command="{Binding GoTo1}"
                Width="90" Height="30"
                Margin="0, 0, 0, 20"/>

            <Button
                Content="Go to View 2"
                Command="{Binding GoTo2}"
                Width="90" Height="30" />

        </StackPanel>

    </Grid>
</UserControl>
Step 4: Use NuGet to install external packages
Appcelerate
See the following NuGet link:
https://www.nuget.org/packages/Appccelerate.StateMachine/
Type the following in the package manager console:
PM> Install-Package Appccelerate.StateMachine -Version 4.4.0
Unity
This is my choice for implementing dependency injection. In dependency injection, passing the dependency to the client, rather than allowing a client to build or find the dependency, is the fundamental requirement of the pattern. The intent behind dependency injection is to decouple objects to the extent that the client code does not have to be changed simply because the object it depends on needs has been changed to a different one.
A post on using Unity in Web API applications can be found here:
PM> Install-Package Unity -Version 5.7.3
Step 5: Create the ViewModel classes
BaseViewModel.cs
using System;
using System.ComponentModel;
using System.Diagnostics;

namespace AppccelerateSpike
{
   public abstract class BaseViewModel : INotifyPropertyChanged
   {
      public event PropertyChangedEventHandler PropertyChanged;

      protected void OnPropertyChanged(string propertyName, IPageViewModel pageViewModel)
      {
         VerifyPropertyName(propertyName);
         PropertyChanged?.Invoke(this, new PropertyChangedEventArgs(propertyName));
      }

      [Conditional("DEBUG")]
      private void VerifyPropertyName(string propertyName)
      {
         if (TypeDescriptor.GetProperties(this)[propertyName] == null)
            throw new ArgumentNullException(GetType().Name + " does not contain property: " + propertyName);
      }
   }
}
MainWindowViewModel.cs
using System.Collections.Generic;
using System.Linq;

namespace AppccelerateSpike
{
   public class MainWindowViewModel : BaseViewModel
   {
      private IPageViewModel _currentPageViewModel;
      private List<IPageViewModel> _pageViewModels;

      public MainWindowViewModel(IViewStateMachine stateMachine)
      {
         stateMachine.ViewModelEvent += OnChangeViewModelEvent;

         // Add available pages and set page
         _pageViewModels = new List<IPageViewModel>
         {
            new UserControl1ViewModel(stateMachine),
            new UserControl2ViewModel(stateMachine),
            new UserControl3ViewModel(stateMachine)
         };

         CurrentPageViewModel = _pageViewModels[0];
      }

      public List<IPageViewModel> PageViewModels
      {
         get
         {
            if (_pageViewModels == null)
               _pageViewModels = new List<IPageViewModel>();

            return _pageViewModels;
         }
      }

      public IPageViewModel CurrentPageViewModel
      {
         get { return _currentPageViewModel; }
         set
         {
            _currentPageViewModel = value;
            OnPropertyChanged("CurrentPageViewModel", _currentPageViewModel);
         }
      }

      private void OnChangeViewModelEvent(object sender, EventArgs<int> e)
      {
         ChangeViewModel(PageViewModels[e.Value]);
      }

      private void ChangeViewModel(IPageViewModel viewModel)
      {
         if (!PageViewModels.Contains(viewModel))
            PageViewModels.Add(viewModel);

         CurrentPageViewModel = PageViewModels
            .FirstOrDefault(vm => vm == viewModel);
      }
   }
}
UserControl1ViewModel.cs
using System.Windows.Input;

namespace AppccelerateSpike
{
   public class UserControl1ViewModel : BaseViewModel, IPageViewModel
   {
      private readonly IViewStateMachine _stateMachine;

      private ICommand _goTo2, _goTo3;

      public UserControl1ViewModel(IViewStateMachine stateMachine)
      {
         _stateMachine = stateMachine;
      }

      public ICommand GoTo2
      {
         get { return _goTo2 ?? (_goTo2 = new RelayCommand(x =>
         {
            _stateMachine.FireEvent(Events.GoToView2);
         })); }
      }

      public ICommand GoTo3
      {
         get
         {
            return _goTo3 ?? (_goTo3 = new RelayCommand(x =>
            {
               _stateMachine.FireEvent(Events.GoToView3);
            }));
         }
      }
   }
}
UserControl2ViewModel.cs
using System.Windows.Input;

namespace AppccelerateSpike
{
   public class UserControl2ViewModel : BaseViewModel, IPageViewModel
   {
      private readonly IViewStateMachine _stateMachine;
      private ICommand _goTo1;

      public UserControl2ViewModel(IViewStateMachine stateMachine)
      {
         _stateMachine = stateMachine;
      }

      public ICommand GoTo1
      {
         get { return _goTo1 ?? (_goTo1 = new RelayCommand(x => { _stateMachine.FireEvent(Events.GoToView1); })); }
      }
   }
}
UserControl3ViewModel.cs
using System.Windows.Input;

namespace AppccelerateSpike
{
   public class UserControl3ViewModel : BaseViewModel, IPageViewModel
   {
      private ICommand _goTo1, _goTo2;

      private readonly IViewStateMachine _stateMachine;

      public UserControl3ViewModel(IViewStateMachine stateMachine)
      {
         _stateMachine = stateMachine;
      }

      public ICommand GoTo1
      {
         get { return _goTo1 ?? (_goTo1 = new RelayCommand(x => { _stateMachine.FireEvent(Events.GoToView1); })); }
      }

      public ICommand GoTo2
      {
         get { return _goTo2 ?? (_goTo2 = new RelayCommand(x => { _stateMachine.FireEvent(Events.GoToView2); })); }
      }

      public void FireEvent(Events events)
      {
         throw new System.NotImplementedException();
      }
   }
}
IPageViewModel.cs
namespace AppccelerateSpike
{
   public interface IPageViewModel
   {
   }
}
Step 6: Create the classes for implementing the state machine
States.cs
Enums to enumerate all states and all actions (events):
namespace AppccelerateSpike
{
   public enum States
   {
      View1 = 0,
      View2,
      View3
   }

   public enum Events
   {
      GoToView1 = 0,
      GoToView2,
      GoToView3
   }
}
IStateMachine.cs
using System;

namespace AppccelerateSpike
{
   public interface IViewStateMachine
   {
      void FireEvent(Events events);
      void ChangeViewModel(int index);
      event EventHandler<EventArgs<int>> ViewModelEvent;
   }
}
StateMachine.cs
using System;
using Appccelerate.StateMachine;

namespace AppccelerateSpike
{
   public class ViewStateMachine : IViewStateMachine
   {
      private readonly PassiveStateMachine<States, Events> _psm;
      private string _localVariable;

      public ViewStateMachine()
      {
         _localVariable = "";

         _psm = new PassiveStateMachine<States, Events>();

         _psm.In(States.View1)
            .On(Events.GoToView2)
            .Goto(States.View2)
            .Execute(() =>
            {
               ChangeViewModel(1);
               // Any other actions you want...
            });

         _psm.In(States.View1)
            .On(Events.GoToView3)
            .Goto(States.View3)
            .Execute(() => { ChangeViewModel(2); });

         _psm.In(States.View2)
            .On(Events.GoToView1)
            .Goto(States.View1)
            .Execute(() => { ChangeViewModel(0); });

         _psm.In(States.View3)
            .On(Events.GoToView1)
            .Goto(States.View1)
            .Execute(() => { ChangeViewModel(0); });

         _psm.In(States.View3)
            .On(Events.GoToView2)
            .Goto(States.View2)
            .Execute(() => { ChangeViewModel(1); });

         _psm.Initialize(States.View1);
         _psm.Start();
      }

      public void FireEvent(Events events)
      {
         _psm.Fire(events);
      }

      public event EventHandler<EventArgs<int>> ViewModelEvent;

      public void ChangeViewModel(int index)
      {
         ViewModelEvent.Raise(this, index);
      }

      private void SetLocalVariables(string variable)
      {
         _localVariable = variable;
      }
   }
}
Passing parameters to the state machine
This is straightforward.
If you wish to introduce parameters (a string) to the following state transition for example:
_psm.In(States.View1)
            .On(Events.GoToView2)
            .Goto(States.View2)
            .Execute(() =>
            {
               ChangeViewModel(1);
               // Any other actions you want...
            });
Just modify it as follows:
_psm.In(States.View1)
            .On(Events.GoToView2)
            .Goto(States.View2)
            .Execute((string text) =>
            {
               ChangeViewModel(1);
               // Any other actions you want...
            });
and the passive state machine ‘Fire’ function can also be passed an event argument too, so just modify it as follows:
public void FireEvent(Events events, object args = null)
      {
         _psm.Fire(events, args);
      }
so an example usage could be
_stateMachine.FireEvent(Events.GoToView2, "Hello");
Step 7: Use the Unity dependency injection to register the state machine class on startup
App.xaml.cs
using System;
using System.Collections.Generic;
using System.Configuration;
using System.Data;
using System.Linq;
using System.Threading.Tasks;
using System.Windows;
using Unity;

namespace AppccelerateSpike
{
   /// <summary>
   /// Interaction logic for App.xaml
   /// </summary>
   public partial class App : Application
   {
      protected override void OnStartup(StartupEventArgs e)
      {
         base.OnStartup(e);

         IUnityContainer container = new UnityContainer();
         container.RegisterType<IViewStateMachine, ViewStateMachine>();

         var context = container.Resolve<MainWindowViewModel>();
         var app = new MainWindow {DataContext = context};
         app.Show();
      }
   }
}
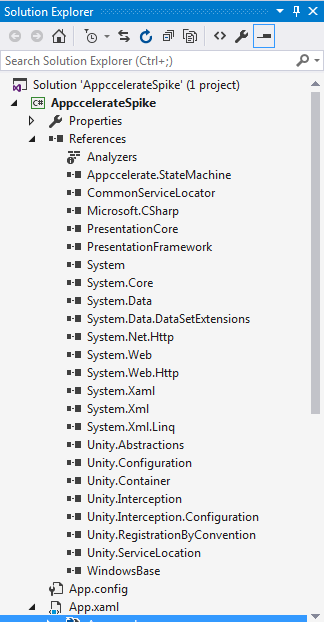
Step 8: Ensure all required libraries are present
As a final check ensure all required libraries are present in your project:
Step 9: Try it!
See this video demonstration showing the view navigations:
https://каучпол.рф стоимость резинового покрытия для детских площадок.