Some instructions and code on how to use the Acitoolkit objects to perform configuration checks against the APIC running state and then create a new Tenant configuration from scratch.
Instructions for setting up acitoolkit for the first time are given here:
https://acitoolkit.readthedocs.io/en/latest/tutorialsetup.html
When trying to use acitoolkit in python for the first time, I got quite a few ‘ModuleNotFoundError’ messages before succeeding. After overcoming this rabbit-hole after much StackOverflow-ing, I managed to get the acitoolkit working. Definitely ensure the Microsoft Visual C++ components have been installed:
https://visualstudio.microsoft.com/downloads/#build-tools-for-visual-studio-2019
You may also get the same problems as I did in needing to do pip installs for acitoolkit, six, websocket, websocket-client and pyrsistent before being able to proceed. What this script does is to import the import the necessary modules for session, tenant, context, bridge domain, and subnet.
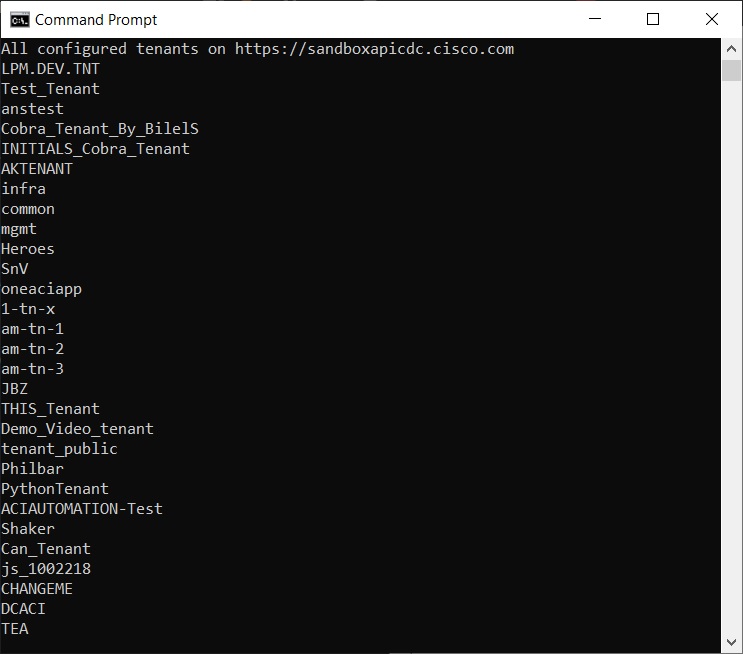
List the Tenant objects in the APIC sandbox
tenants.py
import json

APIC_HOST = "https://sandboxapicdc.cisco.com"
APIC_USERNAME = "admin"
APIC_PASSWORD = "!v3G@!4@Y"

from acitoolkit.acitoolkit import Tenant, Session

session = Session(APIC_HOST, APIC_USERNAME, APIC_PASSWORD)
session.login()
tenants = Tenant.get(session)

print("All configured tenants on {}".format(APIC_HOST))
for tenant in tenants:
    print(tenant.name)
Giving the following output:
Creating a new tenant with application profile
The comment fields tell us what each section does. First you’re defining all the variable names in order to create the tenant, VRF etc. Then we create the bridge domain and its associated subnets, a filter, the contract and the application profile. We then apply all of the elements of the contract to the various EPGs.
Finally, add an optional cleanup step to your script so that it becomes repeatable. Use the mark_as_deleted() method to delete a tenant. Use the same push_to_apic() method as before. This demonstrates how easy it is to also remove configuration by telling the acitoolkit it has to delete an object, instead of creating or modifying it.
appProfile.py
import json
from sys import exit
from acitoolkit.acitoolkit import *
APIC_HOST = "https://sandboxapicdc.cisco.com"
APIC_USERNAME = "admin"
APIC_PASSWORD = "!v3G@!4@Y"
tenant_name = "Marketing"
vrf_name = "Marketing_VRF"
bridge_domain_name = "Marketing_BD"
bridge_domain_subnet = "20.23.21.1/24"
bridge_domain_subnet_name = "Marketing_Subnet"
app_prof_name = "Marketing_APP"
epg_portal_name = "Portal_EPG"
epg_users_name = "Users_EPG"
# Create Tenant
tenant = Tenant(tenant_name)
# Create VRF
vrf = Context(vrf_name, tenant)
# Create Bridge Domain
bridge_domain = BridgeDomain(bridge_domain_name, tenant)
bridge_domain.add_context(vrf)
# Create public subnet and assign gateway
subnet = Subnet(bridge_domain_subnet_name, bridge_domain)
subnet.set_scope("public")
subnet.set_addr(bridge_domain_subnet)
# Create http filter and filter entry
filter_http = Filter("http", tenant)
filter_entry_tcp80 = FilterEntry(
"tcp-80", filter_http, etherT="ip", prot="tcp", dFromPort="http", dToPort="http"
)
# Create Portal contract and use http filter
contract_portal = Contract("Portal", tenant)
contract_subject_http = ContractSubject("http", contract_portal)
contract_subject_http.add_filter(filter_http)
# Create Application Profile
app_profile = AppProfile(app_prof_name, tenant)
# Create Portal EPG and associate bridge domain and contracts
epg_portal = EPG(epg_portal_name, app_profile)
epg_portal.add_bd(bridge_domain)
epg_portal.provide(contract_portal)
# Create Users EPG and associate bridge domain and contracts
epg_users = EPG(epg_users_name, app_profile)
epg_users.add_bd(bridge_domain)
epg_users.consume(contract_portal)
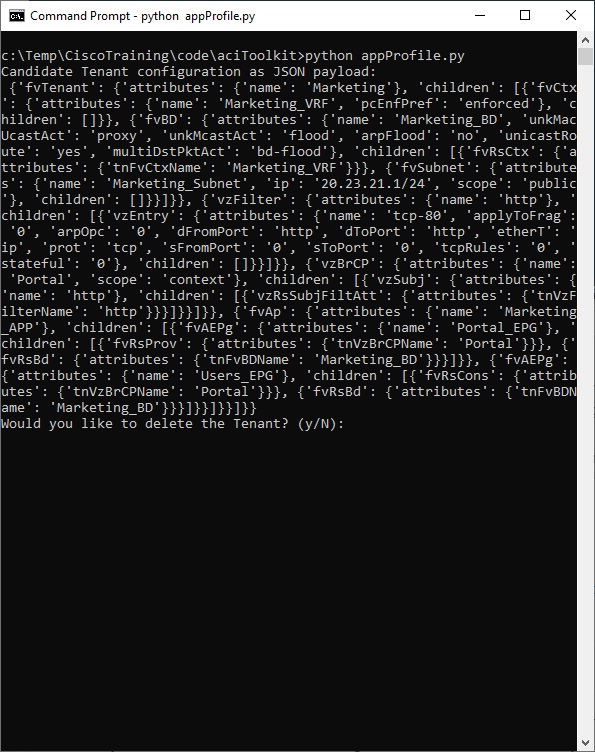
print(f'Candidate Tenant configuration as JSON payload:\n {tenant.get_json()}')
# Connect and push configuration to APIC
session = Session(APIC_HOST, APIC_USERNAME, APIC_PASSWORD)
session.login()
resp = session.push_to_apic(tenant.get_url(), data=tenant.get_json())
if not resp.ok:
print(f'API return code {resp.status_code} with message {resp.text}')
exit(1)
# Delete Tenant
choice = input('Would you like to delete the Tenant? (y/N): ')
if choice.lower().strip() == 'y':
tenant.mark_as_deleted()
# Push configuration to APIC
resp = session.push_to_apic(tenant.get_url(), data=tenant.get_json())
if not resp.ok:
print(f'API return code {resp.status_code} with message {resp.text}')
exit(1)
We can now execute the the script.
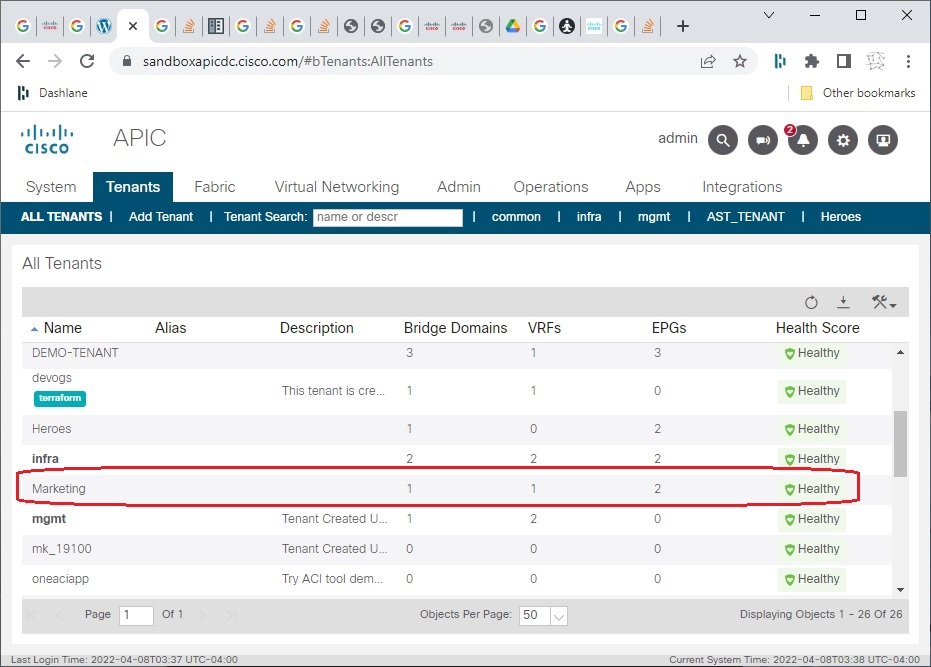
Then we can go to the APIC to verify that these elements have been created. Go to Tenants, and you’ll notice the marketing tenant has been created.
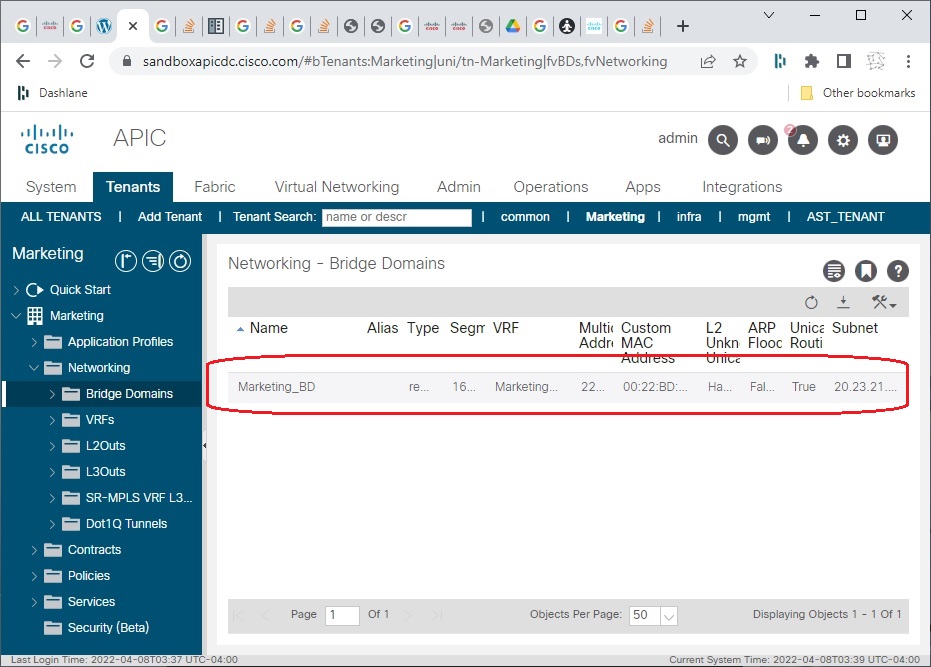
Ditto the EPGs, VRFs, contract relationships, consumer and provider. The contract and filter was created. Bridge domains were created along with the specified subnets. Verify the contract was created, and even the filter.
So we executed that script. It created the tenant, the application profile and EPGs, the VRF, the bridge domain, the subnet, a filter, a contract, and then applied those. You could see just by the speed with which that was executed how much more quickly you can use a script like this to create the various elements, instead of having to go through and click one at a time in the Cisco APIC web GUI.