Cisco Nexus devices, the most popular configuration method uses command-line interfaces (CLI) that run only on the device. This method has limitations and does not scale well. To improve the CLI shortcomings, Cisco introduced NX-API REST by providing HTTP/HTTPS APIs that:
Combine configuration actions into relatively few HTTP/HTTPS operations.
NX-API REST uses HTTP/HTTPS as its transport. Configuration commands are encoded into the HTTP/HTTPS body and use POST as the delivery method. In the backend, NX-API REST uses the Nginx HTTP server. You can instruct the Nginx server to return requested data either in XML or JSON format
The “official” lesson on creating python scripts from NX-API can be found at the Cisco developer site here:
https://developer.cisco.com/learning/lab/nxos-intro-03_nxapi-rest/step/1
The site for the NX developer sandbox I have been using is here:
https://sandbox-nxos-1.cisco.com/
The login credentials for the sandbox are username=”admin” password=”Admin_1234!”
Some pre-requisites need to be completed first.
Enable the NX-API Feature
Before you can make requests from a NX-API Developer Sandbox or use the NX-API interfaces, the nxapi feature must be enabled on the Cisco Nexus switch. Follow these steps to verify it is enabled.
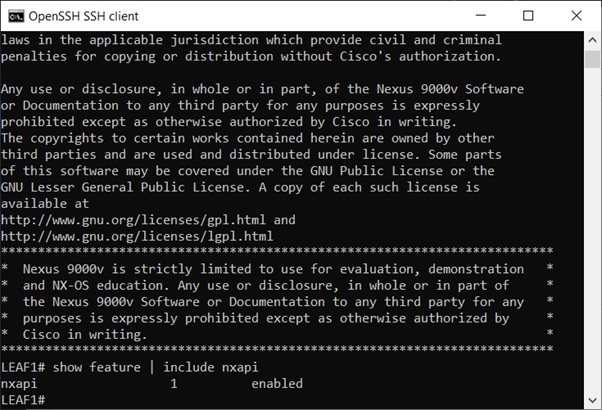
Connect to the Cisco Nexus switch with SSH. For the sandbox-nxos-1.cisco.com sandbox the port number is 22.
ssh -p 22 admin@sandbox-nxos-1.cisco.com
Once connected, access the NX-OSv9k’s CLI and check if it’s nxapi feature is enabled.
show feature | include nxapi
It should show as being enabled:
If the output indicates disabled, the feature is disabled. To enable it, enter global configuration mode and issue the feature nxapi command.
configure terminal
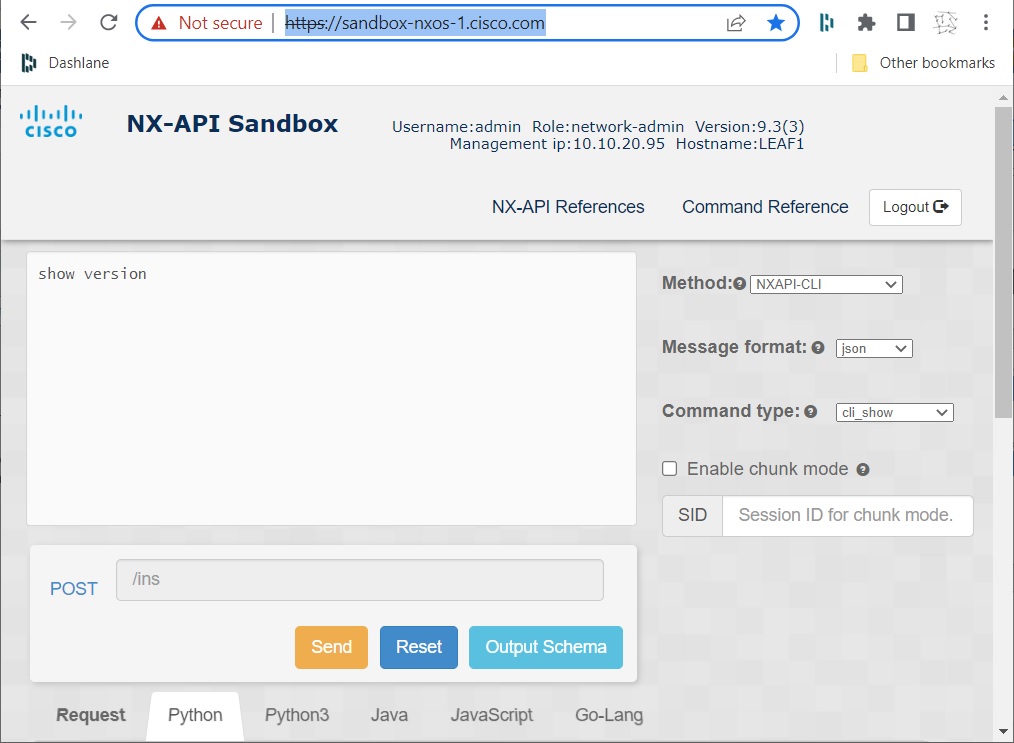
To confirm that it is enabled, use a web browser and navigate to an Open NX-OS address: https://sandbox-nxos-1.cisco.com
The Sandbox credentials are admin / Admin_1234!. Upon successful authentication, you should see the NX-API Developer Sandbox web page.
CLI command: show version
For an example CLI command, type ‘show version’ in the main text area, ensure the ‘json’ message format is selected on the dropdown and click the Send button.
This will create the text response contained in the Response section of the window:
{
  "ins_api": {
    "type": "cli_show",
    "version": "1.0",
    "sid": "eoc",
    "outputs": {
      "output": {
        "input": "show version",
        "msg": "Success",
        "code": "200",
        "body": {
          "header_str": "Cisco Nexus Operating System (NX-OS) Software\nTAC support: http://www.cisco.com/tac\nDocuments: http://www.cisco.com/en/US/products/ps9372/tsd_products_support_series_home.html\nCopyright (c) 2002-2019, Cisco Systems, Inc. All rights reserved.\nThe copyrights to certain works contained herein are owned by\nother third parties and are used and distributed under license.\nSome parts of this software are covered under the GNU Public\nLicense. A copy of the license is available at\nhttp://www.gnu.org/licenses/gpl.html.\n\nNexus 9000v is a demo version of the Nexus Operating System\n",
          "bios_ver_str": "",
          "kickstart_ver_str": "9.3(3)",
          "nxos_ver_str": "9.3(3)",
          "bios_cmpl_time": "",
          "kick_file_name": "bootflash:///nxos.9.3.3.bin",
          "nxos_file_name": "bootflash:///nxos.9.3.3.bin",
          "kick_cmpl_time": "12/22/2019 2:00:00",
          "nxos_cmpl_time": "12/22/2019 2:00:00",
          "kick_tmstmp": "12/22/2019 14:00:37",
          "nxos_tmstmp": "12/22/2019 14:00:37",
          "chassis_id": "Nexus9000 C9300v Chassis",
          "cpu_name": "Intel(R) Xeon(R) CPU E5-4669 v4 @ 2.20GHz",
          "memory": "16408984",
          "mem_type": "kB",
          "proc_board_id": "9N3KD63KWT0",
          "host_name": "LEAF1",
          "bootflash_size": "4287040",
          "kern_uptm_days": "4",
          "kern_uptm_hrs": "2",
          "kern_uptm_mins": "51",
          "kern_uptm_secs": "25",
          "rr_reason": "Unknown",
          "rr_sys_ver": "",
          "rr_service": "",
          "plugins": "Core Plugin, Ethernet Plugin",
          "manufacturer": "Cisco Systems, Inc.",
          "TABLE_package_list": {
            "ROW_package_list": {
              "package_id": "mtx-openconfig-all-1.0.0.0-9.3.3.lib32_n9000"
            }
          }
        }
      }
    }
  }
}
To generate the python, click the Python tab and press the Copy button to copy the python script to your clipboard. This contains the code you need to get started, but as-is will not execute until the placeholders for username, password etc and other bits and pieces are filled in correctly.
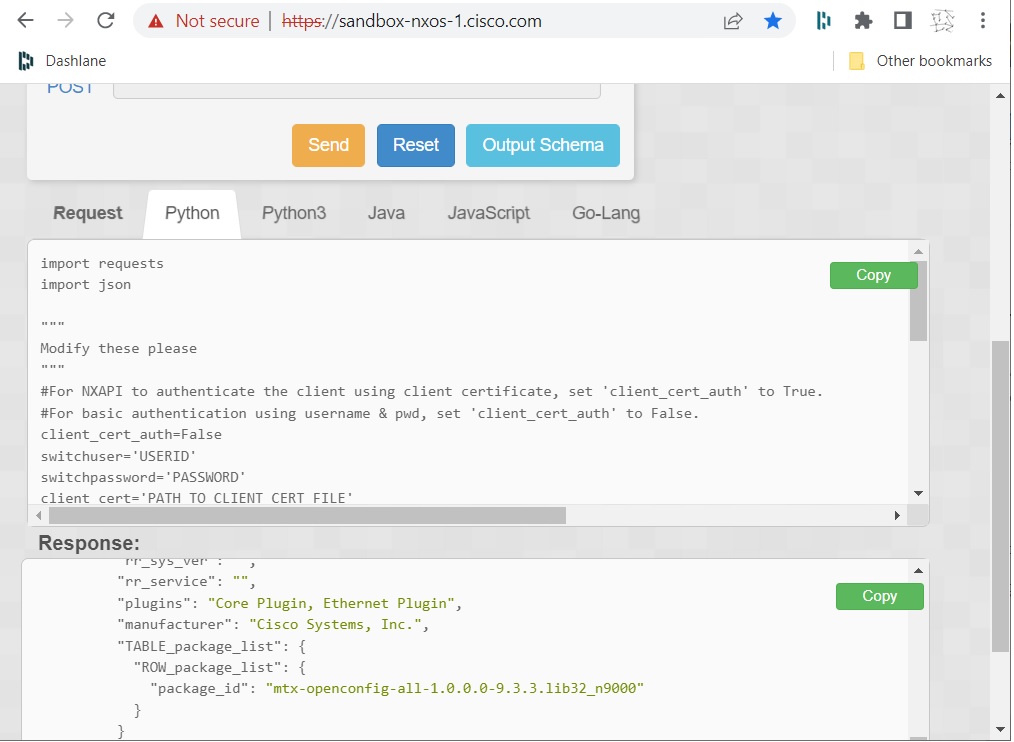
This is the raw python code taken from the Python tab:
import requests
import json

"""
Modify these please
"""
#For NXAPI to authenticate the client using client certificate, set 'client_cert_auth' to True.
#For basic authentication using username & pwd, set 'client_cert_auth' to False.
client_cert_auth=False
switchuser='USERID'
switchpassword='PASSWORD'
client_cert='PATH_TO_CLIENT_CERT_FILE'
client_private_key='PATH_TO_CLIENT_PRIVATE_KEY_FILE'
ca_cert='PATH_TO_CA_CERT_THAT_SIGNED_NXAPI_SERVER_CERT'

url='http://10.10.20.95/ins'
myheaders={'content-type':'application/json'}
payload={
  "ins_api": {
    "version": "1.0",
    "type": "cli_show",
    "chunk": "0",
    "sid": "sid",
    "input": "show version",
    "output_format": "json"
  }
}

if client_cert_auth is False:
    response = requests.post(url,data=json.dumps(payload), headers=myheaders,auth=(switchuser,switchpassword)).json()
else:
    url='https://10.10.20.95/ins'
    response = requests.post(url,data=json.dumps(payload), headers=myheaders,auth=(switchuser,switchpassword),cert=(client_cert,client_private_key),verify=ca_cert).json()
This is the modified code used to get the required response for getting the version information. It also contains code to loop through and print the package IDs contained in the response too. It also contains code to suppress warnings for lack of SSL certificates etc.
import requests
import json

url = 'https://sandbox-nxos-1.cisco.com/ins'

payload={
  "ins_api": {
    "version": "1.0",
    "type": "cli_show",
    "chunk": "0",
    "sid": "sid",
    "input": "show version",
    "output_format": "json"
  }
}

requests.packages.urllib3.disable_warnings()
response = requests.post(url,data=json.dumps(payload), headers={'content-type':'application/json'},auth=('admin', 'Admin_1234!'), verify=False).json()

vlan_list = response["ins_api"]["outputs"]["output"]["body"]["TABLE_package_list"]["ROW_package_list"]

for vlan in vlan_list :
   print("Package ID: {}".format(vlan_list["package_id"]))
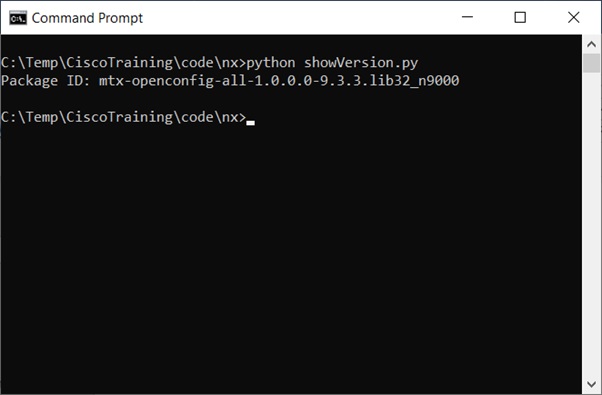
Output as follows:
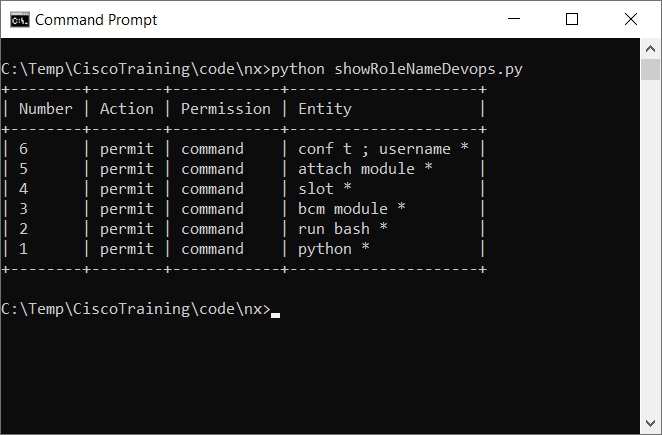
CLI command: show role name dev-ops
Predefined system role for dev-ops access. This role cannot be modified.
showRoleNameDevops.py
(To use the pretty table print facility in this code you might have to first install it via: python -m pip install -U prettytable)
import requests
import json
from prettytable import PrettyTable

url = 'https://sandbox-nxos-1.cisco.com/ins'

payload={
  "ins_api": {
    "version": "1.0",
    "type": "cli_show",
    "chunk": "0",
    "sid": "sid",
    "input": "show role name dev-ops  ",
    "output_format": "json"
  }
}

requests.packages.urllib3.disable_warnings()
response = requests.post(url,data=json.dumps(payload), headers={'content-type':'application/json'},auth=('admin', 'Admin_1234!'), verify=False).json()

rules = response["ins_api"]["outputs"]["output"]["body"]["TABLE_role"]["ROW_role"]["TABLE_rule"]["ROW_rule"]

# 1st install prietty table via:  python -m pip install -U prettytable
table = PrettyTable(['Number', 'Action', 'Permission', 'Entity'])
for rule in rules :
   table.add_row([rule["rule_num"], rule["rule_action"], rule["rule_permission"], rule["rule_entity"]])

table.align = "l"
print(table)
Giving the following output: