Tag: Visual Studio

  • Using TypeScript in Visual Studio 2017

    See this link for very similar instructions:

    https://www.typescriptlang.org/docs/handbook/asp-net-core.html

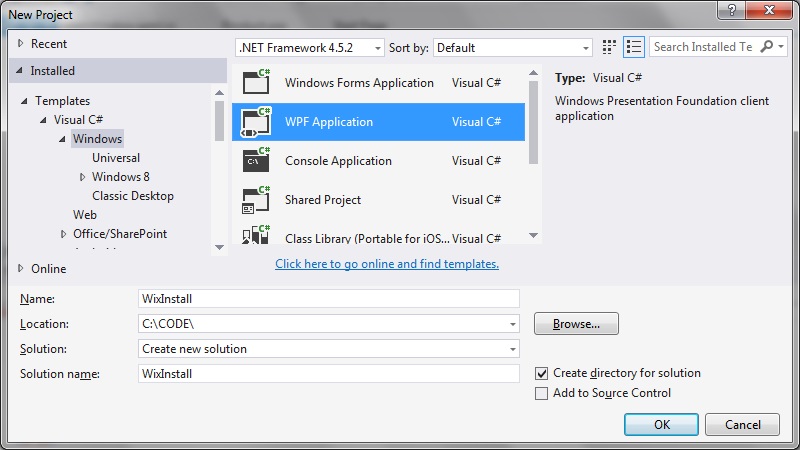
    Step 1: Create a new Asp.Net Core project

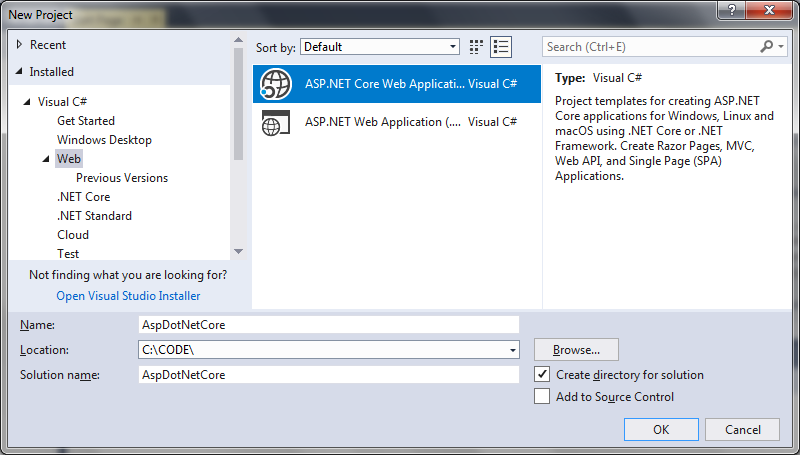
    Select Empty project:
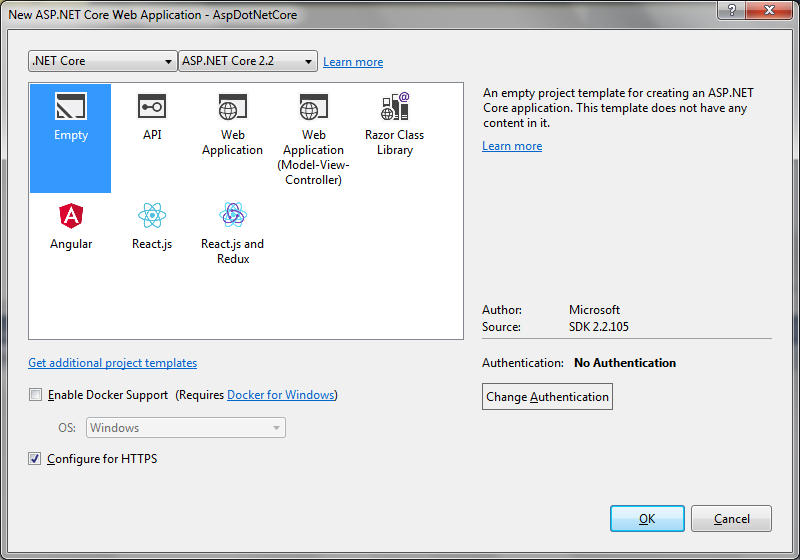
    Click OK.

    Step 2: Add Microsoft.AspNetCore.StaticFiles via NuGet

    Right click on Dependencies and select Manage NuGet Packages:

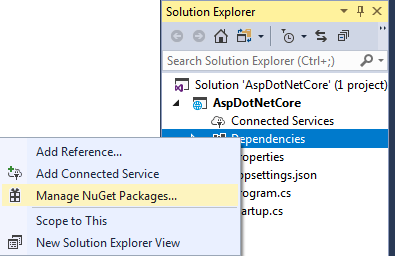
    Select Browse and search for ‘Microsoft.AspNetCore.StaticFiles’:

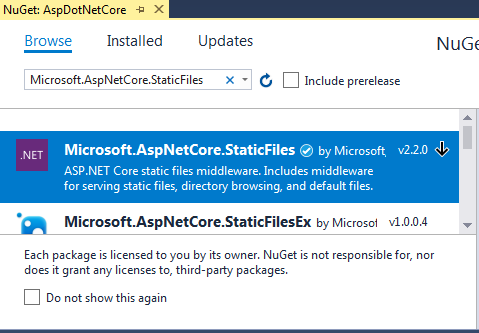
    Select this item and click Install.

    Step 3: Add a scripts folder for TypeScript

    First update the body of Configure in Startup.cs file as shown:

    Startup.cs

    using Microsoft.AspNetCore.Builder;
    using Microsoft.Extensions.DependencyInjection;
    
    namespace AspDotNetCore
    {
        public class Startup
        {
            // This method gets called by the runtime. Use this method to add services to the container.
            // For more information on how to configure your application, visit https://go.microsoft.com/fwlink/?LinkID=398940
            public void ConfigureServices(IServiceCollection services)
            {
            }
    
            // This method gets called by the runtime. Use this method to configure the HTTP request pipeline.
            public void Configure(IApplicationBuilder app)
            {
                app.UseDefaultFiles();
                app.UseStaticFiles();
            }
        }
    }
    

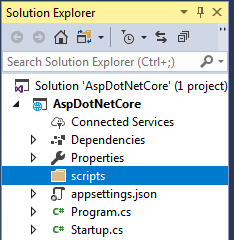
    Right click on the project, select Add > New Folder.

    Rename it to scripts:

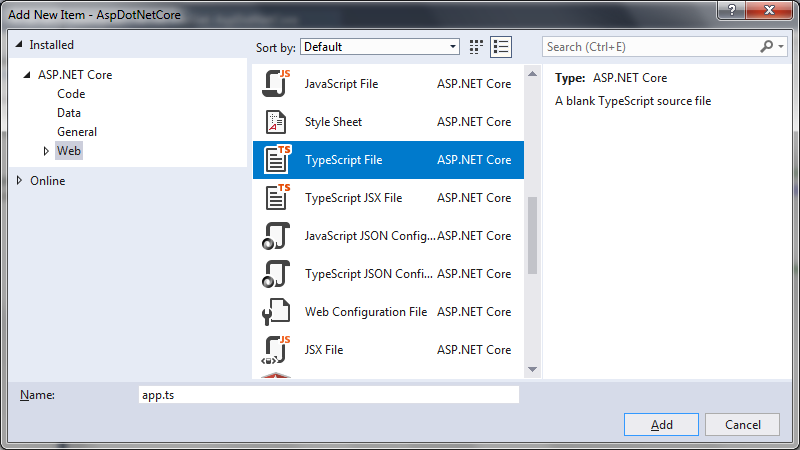
    Right click on scripts and select Add > New Item.

    Choose TypeScript File (it may be in the .NET Core section) and name the file app.ts.

    Type the following code into app.ts.

    app.ts

    function sayHello() {
        const compiler = (document.getElementById("compiler") as HTMLInputElement).value;
        const framework = (document.getElementById("framework") as HTMLInputElement).value;
        return `Hello from ${compiler} and ${framework}!`;
    }
    

    Step 4: Configure the TypeScript compiler

    We need to configure TypeScript on how to build.

    Right click on the scripts folder and click Add > New Item. Choose TypeScript Configuration File and use the default name tsconfig.json:

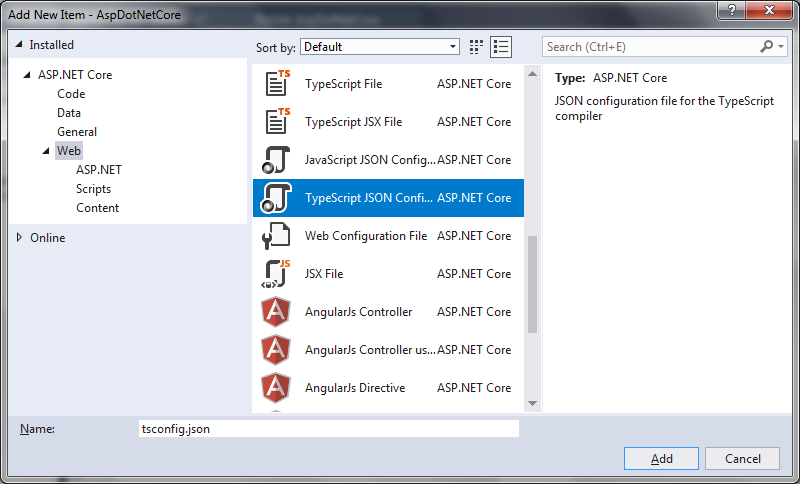
    Replace the default tsconfig.json with the following:

    tsconfig.json

    {
      "compilerOptions": {
          "noImplicitAny": true,
          "noEmitOnError": true,
          "sourceMap": true,
          "target": "es5"
      },
      "files": [
          "./app.ts"
      ],
      "compileOnSave": true
    }
    

    Step 5: Set up NPM

    Set up NPM so we can download JavaScript packages.

    Right click on the project and click Add > New Item.

    Choose NPM Configuration File and use the default name package.json:

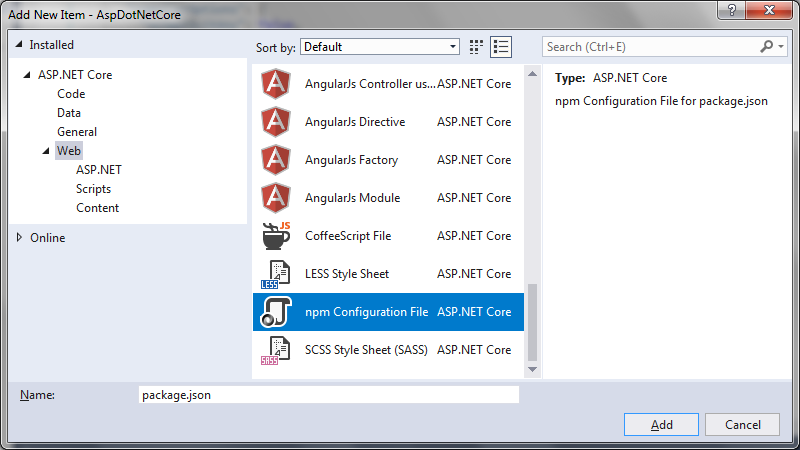
    Inside “devDependencies” add “gulp” and “del”:

    package.json

    {
      "version": "1.0.0",
      "name": "asp.net",
      "private": true,
      "devDependencies": {
        "gulp": "3.9.0",
        "del": "2.2.0"
      }
    }
    

    Visual Studio should start installing gulp and del as soon as you save the file. If not, right-click package.json and then Restore Packages.

    Step 6: Set up gulp

    Right click on the project and select Add > New item. Select a Javascript file and name it as gulpfile.js.

    Put the following code inside. The first line tells Visual Studio to run the task ‘default’ after the build finishes. It will also run the ‘clean’ task when you ask Visual Studio to clean the build.

    gulpfile.js

    /// <binding AfterBuild='default' Clean='clean' />
    /*
    This file is the main entry point for defining Gulp tasks and using Gulp plugins.
    Click here to learn more. http://go.microsoft.com/fwlink/?LinkId=518007
    */
    
    var gulp = require('gulp');
    var del = require('del');
    
    var paths = {
        scripts: ['scripts/**/*.js', 'scripts/**/*.ts', 'scripts/**/*.map'],
    };
    
    gulp.task('clean', function () {
        return del(['wwwroot/scripts/**/*']);
    });
    
    gulp.task('default', function () {
        gulp.src(paths.scripts).pipe(gulp.dest('wwwroot/scripts'))
    });
    

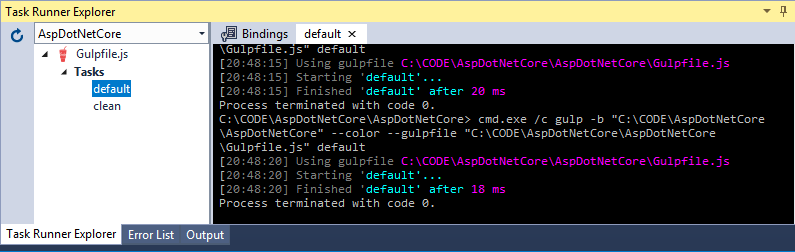
    Right-click on gulpfile.js and click Task Runner Explorer. If ‘default’ and ‘clean’ tasks don’t show up, refresh the explorer:

    Step 7: Write an HTML page

    Write click on the project item called wwwroot and add a New Item named index.html.

    Use the following code for index.html:

    index.html

    <!DOCTYPE html>
    <html>
    <head>
        <meta charset="utf-8" />
        <script src="scripts/app.js"></script>
        <title></title>
    </head>
    <body>
        <div id="message"></div>
        <div>
            Compiler: <input id="compiler" value="TypeScript" onkeyup="document.getElementById('message').innerText = sayHello()" /><br />
            Framework: <input id="framework" value="ASP.NET" onkeyup="document.getElementById('message').innerText = sayHello()" />
        </div>
    </body>
    </html>
    

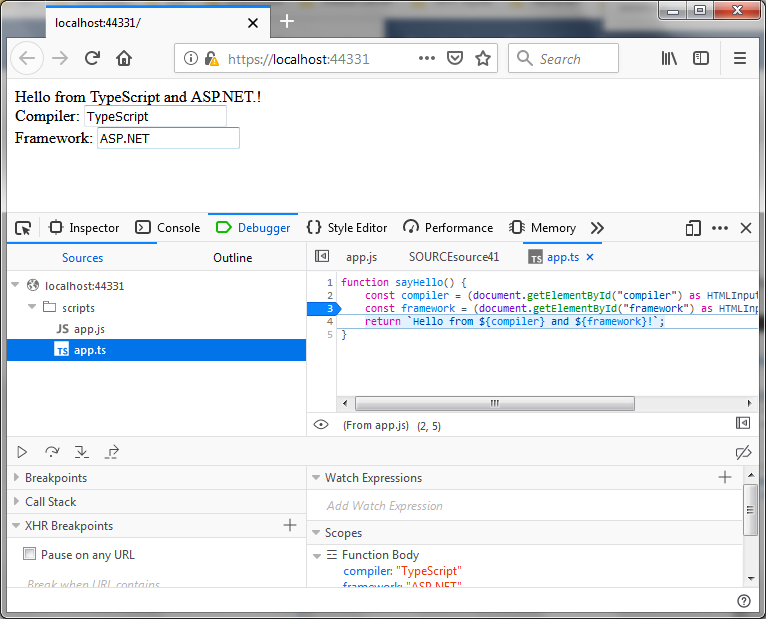
    Step 8: Run the project

    Run the project. When the browser appears you will see some text boxes as shown.

    Stick a breakpoint somewhere inside scripts.app.ts.

    Type something into one of the textboxes and observe that the breakpoint is hit as shown in the Firefox browser I am using:

  • Using the WiX Toolset to create installers in Visual Studio C# projects

    Using the WiX Toolset to create installers in Visual Studio C# projects

    Here is some of their online documentation on how to use the WiX Toolset to create installers:

    https://www.firegiant.com/wix/tutorial/getting-started

    Here is a quick and concise guide to set up using the WiX Toolset in a Visual Studio project, in order to create installation packages, from start to finish.

    Step 1: Install WiX Toolset

    First make sure you have installed the WiX toolset from the following site:

    http://wixtoolset.org/releases/

    WiX Toolset when run looks like this:

    WiX Toolset to create installers
    WiX Toolset to create installers

    Step 2: Create a new Visual Studio project

    In this example I’m creating a new WPF application:

    Step 3: Add a WiX installer project to the solution

    Right click on your solution folder and select Add > New Project…

    Select ‘Windows Installer XML’ > ‘Setup Project’ and give your installer project a name:

    Step 4: generate GUID(s) for your .wxs file

    The Product > Id field in the ‘Product.wxs’ file of this installer project needs to have a string value to uniquely identify it. There are plenty of tools you can use to generate this string.

    I like this one:

    https://www.guidgenerator.com/

    Which generated for me:

    [/code language=”txt”]
    4495c49a-f6d0-4e28-9166-8158e708a13f
    [/code]

    (Please generate your own GUID, rather than copy this one)

    Then update your ‘Product.wxs’ file, filling in the ‘Id’ and ‘Manufacturer’ fields eg:

    <Product 
        Id="4495c49a-f6d0-4e28-9166-8158e708a13f" 
        Name="Installer" 
        Language="1033" 
        Version="1.0.0.0" 
        Manufacturer="WiXInstaller" 
        UpgradeCode="3dd34437-eb60-410c-bb1a-f17f077ccdd3">
    

    Step 5: Add the references to your installer project

    In the Installer project, right-click the project folder and select Add > Reference.

    Step 6: Set where to install your files

    We need to be able to define where the program executable will get installed, plus any other files we wish to copy over as part of the installation.

    In the ‘Component’ part of the Project.wxs file, remove the automatically generated comments and insert the definitions for the files you which to install, as well as the destination for these files. The complete Project.wxc file now looks lie this:

    <?xml version="1.0" encoding="UTF-8"?>
    <Wix xmlns="http://schemas.microsoft.com/wix/2006/wi">
    	<Product 
        Id="4495c49a-f6d0-4e28-9166-8158e708a13f" 
        Name="Installer" 
        Language="1033" 
        Version="1.0.0.0" 
        Manufacturer="WiXInstaller" 
        UpgradeCode="3dd34437-eb60-410c-bb1a-f17f077ccdd3">
    		
        <Package InstallerVersion="200" Compressed="yes" InstallScope="perMachine" />
    
    		<MajorUpgrade DowngradeErrorMessage="A newer version of [ProductName] is already installed." />
    		<MediaTemplate />
    
    		<Feature Id="ProductFeature" Title="Installer" Level="1">
    			<ComponentGroupRef Id="ProductComponents" />
    		</Feature>
    	</Product>
    
    	<Fragment>
    		<Directory Id="TARGETDIR" Name="SourceDir">
    			<Directory Id="ProgramFilesFolder">
    				<Directory Id="INSTALLFOLDER" Name="WixInstallerExample" />
    			</Directory>
    		</Directory>
    	</Fragment>
    
    	<Fragment>
    		<ComponentGroup Id="ProductComponents" Directory="INSTALLFOLDER">			
    			<Component Id="ProductComponent">
            <File Source="$(var.WixInstall.TargetPath)" />
          </Component>
    		</ComponentGroup>
    	</Fragment>
    </Wix>
    

    Step 7: Re-build both projects and try it out

    Upon re-building the ‘Install’ project, navigate to the bin/Debug folder and see that the Installer.msi file has been generated:

    On running the msi installer file we can then see how the program executable and program folder both get installed to the C:\Program Files directory:

    Adding additional files to the install

    Besides the main executable, it is possible to include additional resource files to the install, such icon resources, dlls, etc. To do this, just update the ‘Component’ section of the Product.wxc – one way is to simple provide a relative path to the new file:

    <Fragment>
    	<ComponentGroup Id="ProductComponents" Directory="INSTALLFOLDER">
    		<Component Id="MainExecutable" Guid="f5207608-9c81-4317-89de-061066ec863c">
    			<File Source="$(var.WixInstall.TargetPath)" />
    		</Component>
    		
    		<Component Id="icon.ico" Guid="7805267a-624b-41e7-baaf-49b82c0439cc">        
    			<File Id='icon.ico' Name='icon.ico' Source="..\WixInstall\icon.ico" KeyPath='yes' />
    		</Component>
    	</ComponentGroup>
    </Fragment>
    

    To create a subdirectory within the Installation folder

    You need to:

    1. Nest the subfolder underneath INSTALLFOLDER
    2. Create the Feature Component with the CreateFolder bit inside.

    Example code:

    <Fragment>
    	<Directory Id="TARGETDIR" Name="SourceDir">
    		<Directory Id="ProgramFilesFolder">
    			<Directory Id="INSTALLFOLDER" Name="WixInstallerExample" >
    				<Directory Id="test" Name="AnotherDirectory">
    					<Component Id="test" Guid="e29f1a9e-3ede-40d6-aba0-bfe451002ee3"
    					  SharedDllRefCount="no" KeyPath="no" NeverOverwrite="no" Permanent="no" Transitive="no" Win64="no" Location="either">
    						<CreateFolder/>
    					</Component>
    				</Directory>              
    			</Directory>
    		</Directory>
    	</Directory>
    
    	<Feature Id="test" Title="testfolder" Level="1">
    		<ComponentRef Id="test"/>
    	</Feature>
    </Fragment>
    
  • How to rename a project folder in Visual Studio

    Example folder name ‘PortableMedia’ that I wish to rename to ‘Renishaw.IDT.Powers.PortableMedia’:

    renamevisualstudiofolder1

    Step 1: Close the VS solution and nename the folder in source control

    ‘PortableMedia’

    renamevisualstudiofolder2

    Gets changed to ‘Renishaw.IDT.Powers.PortableMedia’:

    renamevisualstudiofolder3

    Re-open the solution.

    Observe that the renamed project that is now marked as unavailable in the Solution Explorer:

    renamevisualstudiofolder4

    Open the Properties pane on that unavailable folder: Just select properties window – you can’t right-click and select properties anymore…

    renamevisualstudiofolder5

    Edit the folder and update the path name:

    renamevisualstudiofolder6

    (If you have problems doing this then just edit the *.sln file using notepad++ and change the ‘File Path’ property in there)

    Right click on that unavailable project and try to reload project. This should work now:

    renamevisualstudiofolder7

    Remove the old folder in your workspace folder:

    renamevisualstudiofolder8

    You might get the following build whinge

    1>—— Build started: Project: RenishawOnDemand.TestHarness, Configuration: Debug x64 ——
    1>C:\Program Files (x86)\MSBuild\14.0\bin\Microsoft.Common.CurrentVersion.targets(1611,5): warning : The referenced project ‘..\PortableMedia\Renishaw.IDT.Powers.PortableMedia.csproj’ does not exist.
    1> RenishawOnDemand.TestHarness -> E:\IDT\POWERS\Windows App\APP\RenishawOnDemand\RenishawOnDemand\RenishawOnDemand\bin\x64\Debug\Renishaw.IDT.Powers.RenishawOnDemand.TestHarness.exe
    ========== Build: 1 succeeded, 0 failed, 2 up-to-date, 0 skipped ==========

    In this case just look for instances of where the old folder location is still being referenced (in my case it was the app.config) and update these:

    renamevisualstudiofolder9

  • Getting started with Spire.XLS for .NET

    E-iceblue Ltd. is a vendor of powerful components for .NET, Silverlight and WPF development. These products enable the user to easily read and write different formats of office files.

    A quick an easy guide to setting up Spire.XLS for use in Visual Studio .NET projects is presented here.

    For the purpose of clarity and helping the user get started as soon as possible, a simple ‘HelloWorld’ example is presented.
    (more…)

  • How to Create an Installer with Microsoft Visual Studio

    Introduction

    Visual Studio 2010 contains a package that enables you to create Windows installer files for your applications. Follow these simple steps to build your own setup package for the Visual Studio application you are working on.
    (more…)

  • Using FLTK in Visual Studio

    Note: for configuring FLTK in Linux environments, please refer to this post.

    1. Download and extract FLTK

    For this particular install I used an old Visual Studio 2003 .NET version. Get the zipped file from the download section of Bill Spitzak’s FLTK site. Unzip the file and place it somewhere suitable such as C:\fltk-1.1.10-source. (more…)

  • Getting Started with OpenGL for Windows

    For setting up OpenGL in Ubuntu Linux, please see this post, otherwise for Windows / Visual Studio environments, please use these following instructions:

    1. Download the latest Windows drivers

    As stated on the OpenGLs wiki page, OpenGL more or less comes with the Windows operating system. You will need to ensure your PC has the latest drivers for your graphics hardware, however. Without these drivers, you will probably default to the software version of OpenGL 1.1 which is considerably slower. (more…)

  • Getting Started with Boost Threads in Visual Studio

    Introduction

    This post aims to be an accessible introduction to getting set up with the Boost threads in Visual Studio environments for the first time.  Like with many technical subjects, there is a great deal of information out on the internet, that tells you a lot without actually showing you anything! (more…)

  • Getting Started with the CU Decision Diagram (CUDD) Package for Windows

    I have managed to download, uncompress and compile this library in a Visual Studio environment. At last.  Though a very powerful package for the implementation of binary decision diagrams, the documentation for its actual set-up for non-Unix environments seems a little sketchy and somewhat intimidating for the beginner.  (more…)

  • Getting Started with OpenCV in Visual Studio

    OpenCV is a free, open source library that enables your computer application to “see” and make decisions from the image data it acquires.  Here are some guides for setting up OpenCV for use in Microsoft Visual Studio Environments: (more…)