Tag: C#

  • Applying the 2-opt algorithm to travelling salesman problems in C# / WPF

    For the Java equivalent see this link:

    https://www.technical-recipes.com/2017/applying-the-2-opt-algorithm-to-traveling-salesman-problems-in-java/

    For the C++ equivalent see this link:

    https://www.technical-recipes.com/2012/applying-c-implementations-of-2-opt-to-travelling-salesman-problems/

    This post demonstrates how to apply the 2-opt algorithm to a number of standard test problems in C# while displaying the
    results in a WPF style window, while using the MVVM design pattern.

    See this link for an overview of the two opt algorithm.

    http://en.wikipedia.org/wiki/2-opt

    But essentially the 2-opt link swapping heuristic can be summarised by the following steps:

    The actual 2-opt heuristic can be summarised by the following pseudocode steps, repeating for all feasible combinations of I and k:

    1. take route[1] to route[i-1] and add them in order to new_route
    2. take route[i] to route[k] and add them in reverse order to new_route
    3. take route[k+1] to end and add them in order to new_route       
    4. return the new_route;  
    

    Architecture

    This application is designed around the Model View ViewModel architecture (MVVM). I find that MVVM allows for a nice clean separation between the graphical
    display, the business logic and data handling.

    https://en.wikipedia.org/wiki/Model%E2%80%93view%E2%80%93viewmodel

    As with the Java and C++ versions, the user interface is a simple window with buttons for opening the test problem (*.tsp file) and a run button to execute the algorithm(which causes the
    display to get updated and re-draw the tour links each time a better tour is found)

    Building the User Interface in XAML

    I use standard WPF / XAML for the user interface components and the canvas in which to draw the city nodes, tour links etc:

    MainWindow.xaml

    <Window x:Class="TwoOpt.MainWindow"
            xmlns="http://schemas.microsoft.com/winfx/2006/xaml/presentation"
            xmlns:x="http://schemas.microsoft.com/winfx/2006/xaml"
            xmlns:d="http://schemas.microsoft.com/expression/blend/2008"
            xmlns:mc="http://schemas.openxmlformats.org/markup-compatibility/2006"
            xmlns:twoOpt="clr-namespace:TwoOpt"
            mc:Ignorable="d"        
            Title="{Binding Title}" 
            Height="620" Width="600">
        
        <Window.DataContext>
            <twoOpt:MainWindowViewModel />
        </Window.DataContext>
            
        <Grid>
            <Grid.RowDefinitions>
                <RowDefinition Height="70" />
                <RowDefinition Height="5" />
                <RowDefinition Height="*" />
                <RowDefinition Height="5" />
            </Grid.RowDefinitions>
            
            <StackPanel 
                Orientation="Horizontal">
                <Button 
                    Command="{Binding OpenCommand}"
                    Width="110" 
                    Content="Open" 
                    Margin="10" />
                
                <Button 
                    Width="110" 
                    Command="{Binding RunCommand}"
                    Content="Run" 
                    Margin="10"/>
                
                <Grid VerticalAlignment="Center" Width="200" Margin="10">
                    <Grid.RowDefinitions>
                        <RowDefinition Height="25" />
                        <RowDefinition Height="25" />
                    </Grid.RowDefinitions>
                    
                    <Label 
                        VerticalContentAlignment="Center"
                        Name="BestLabel"
                        VerticalAlignment="Center"/>
                    
                    <Label 
                        VerticalContentAlignment="Center"
                        Name="IterationLabel"                    
                        Grid.Row="1" />
                </Grid>
            </StackPanel>
    
            <Grid               
                Grid.Row="2">
                <Grid.ColumnDefinitions>
                    <ColumnDefinition Width="10" />
                    <ColumnDefinition Width="*" />
                    <ColumnDefinition Width="10" />
                </Grid.ColumnDefinitions>
    
                <Grid.RowDefinitions>
                    <RowDefinition Height="5" />
                    <RowDefinition Height="*" />
                    <RowDefinition Height="5" />
                </Grid.RowDefinitions>
    
                <Grid Name="DisplayGrid" Grid.Column="1" Grid.Row="1">
                    <Canvas Name="CanvasGrid">
                    </Canvas>
                </Grid>
            </Grid>
        </Grid>
    </Window>
    

    The ViewModel class

    This class I use for handling the business logic and the responding to the button press events from the main user interface.

    MainWindowViewModel.cs

    using System;
    using System.Collections.Generic;
    using System.IO;
    using System.Text;
    using System.Windows.Forms;
    using System.Windows.Input;
    
    namespace TwoOpt
    {
       public class MainWindowViewModel : BaseViewModel
       {
          private readonly Model _model;
          private ICommand _openCommand;
          private ICommand _runCommand;    
    
          public MainWindowViewModel()
          {
             _model = new Model();
             _model.TourUpdated += ModelOnTourUpdated;
          }
    
          public IMainWindow MainWindow { get; set; }
    
          public string Title
          {
             get { return _model.Title; }
             set
             {
                _model.Title = value;
                OnPropertyChanged("Title");
             }
          }
    
          public ICommand OpenCommand
          {
             get
             {
                return _openCommand ?? (_openCommand = new RelayCommand(
                          x =>
                          {
                             var openFileDialog1 = new OpenFileDialog
                             {
                                InitialDirectory = "c:\\",
                                Filter = @"txt files (*.tsp)|*.tsp|All files (*.*)|*.*",
                                FilterIndex = 2,
                                RestoreDirectory = true
                             };
    
                             if (openFileDialog1.ShowDialog() != DialogResult.OK) return;
    
                             try
                             {
                                Stream stream;
                                // ReSharper disable once ConditionIsAlwaysTrueOrFalse
                                if ((stream = openFileDialog1.OpenFile()) == null) return;
    
                                var height = MainWindow.GridHeight();
                                var width = MainWindow.GridWidth();
    
                                _model.CancelJobs();
                                _model.InitMatrix(stream, height, width);
                                Title = _model.Title;
                                DisplayNodes();
                                MainWindow.UpdateIteration(0, 0, null);
                             }
                             catch (Exception ex)
                             {
                                MessageBox.Show(@"Error: Could not read file from disk. Original error: " + ex.Message);
                             }
                          }));
             }
          }
    
          public ICommand RunCommand
          {
             get
             {
                return _runCommand ?? (_runCommand = new RelayCommand(
                          x => { _model.Run(); }));
             }
          }
    
          public List<Pair> Lines => _model.TourCoords;
    
          private void ModelOnTourUpdated(object sender, EventArgs<Tuple<double, int>> eventArgs)
          {
             var iter = eventArgs.Value.Item2;
             var best = eventArgs.Value.Item1;
    
             Update(best, iter);
          }
    
          public IEnumerable<string> ReadLines(Func<Stream> streamProvider,
             Encoding encoding)
          {
             using (var stream = streamProvider())
             {
                using (var reader = new StreamReader(stream, encoding))
                {
                   string line;
                   while ((line = reader.ReadLine()) != null)
                      yield return line;
                }
             }
          }
    
          private void DisplayNodes()
          {
             MainWindow?.PlotNodes(_model.DisplayCoords);
          }
    
          private void Update(double best, int iter)
          {
             MainWindow.UpdateIteration(best, iter, _model.TourCoords);
          }
       }
    }
    

    Within this code I also make use of the Supervisor Controlling Pattern as means of accessing the View controls from within the ViewModel class.

    It does this by allowing MainWindow.xaml.cs to inherits from the IMainWindow interface, which provide the functions to plot the nodes and draw the links:

    IMainWindow.cs

    using System.Collections.Generic;
    
    namespace TwoOpt
    {
       public interface IMainWindow
       {
          void UpdateIteration(double best, int iter, List<Pair> tourCoords);
          void PlotNodes(List<Pair> displayCoords);
      
          double GridHeight();
          double GridWidth();
       }
    }
    

    MainWindow.xaml.cs

    using System.Collections.Generic;
    using System.Windows.Controls;
    using System.Windows.Media;
    using System.Windows.Shapes;
    
    namespace TwoOpt
    {
       /// <summary>
       ///    Interaction logic for MainWindow.xaml
       /// </summary>
       public partial class MainWindow : IMainWindow
       {
          public MainWindow()
          {
             InitializeComponent();
    
             var mainWindowViewModel = DataContext as MainWindowViewModel;
    
             if (mainWindowViewModel != null)
                mainWindowViewModel.MainWindow = this;
          }
    
          public void PlotNodes(List<Pair> displayCoords)
          {
             CanvasGrid.Children.Clear();
    
             InvalidateVisual();
    
             foreach (var coord in displayCoords)
             {
                var ellipse = new Ellipse
                {
                   Width = 4,
                   Height = 4,
                   Fill = Brushes.Blue
                };
    
                Canvas.SetLeft(ellipse, coord.X());
                Canvas.SetTop(ellipse, coord.Y());
    
                CanvasGrid.Children.Add(ellipse);
             }
          }    
    
          public double GridHeight()
          {
             return DisplayGrid.ActualHeight;
          }
    
          public double GridWidth()
          {
             return DisplayGrid.ActualWidth;
          }
    
          public void UpdateIteration(double best, int iter, List<Pair> tourCoords)
          {
             Dispatcher.Invoke(() =>
             {
                IterationLabel.Content = "Iteration: " + iter;
                BestLabel.Content = "Best distance: " + (int)best;
    
                if (tourCoords == null) return;          
    
                var size = tourCoords.Count;
                var startCoord = tourCoords[0];
                CanvasGrid.Children.Clear();
    
                for (var i = 1; i < size; ++i)
                {
                   var endCoord = tourCoords[i];
    
                   var link = new Line
                   {
                      X1 = startCoord.X() + 2,
                      Y1 = startCoord.Y() + 2,
                      X2 = endCoord.X() + 2,
                      Y2 = endCoord.Y() + 2,
    
                      Stroke = Brushes.Blue
                   };
    
                   CanvasGrid.Children.Add(link);
                   startCoord = tourCoords[i];
                }
    
                var finalLink = new Line
                {
                   X1 = tourCoords[0].X() + 2,
                   Y1 = tourCoords[0].Y() + 2,
                   X2 = tourCoords[size - 1].X() + 2,               
                   Y2 = tourCoords[size - 1].Y() + 2,
                   Stroke = Brushes.Blue
                };
    
                CanvasGrid.Children.Add(finalLink);
             });         
          }
       }
    }
    

    C# implementation of the 2-opt algorithm

    // Do all 2-opt combinations
          private void TwoOpt()
          {
             // Get tour size
             var size = _tour.TourSize();
    
             //CHECK THIS!!		
             for (var i = 0; i < size; i++)
             {
                _newTour.SetCity(i, _tour.GetCity(i));
             }
    
             // repeat until no improvement is made 
             var improve = 0;
             var iteration = 0;
    
             while (improve < 500)
             {
                var bestDistance = _tour.TourDistance();
    
                for (var i = 1; i < size - 1; i++)
                {
                   for (var k = i + 1; k < size; k++)
                   {
                      TwoOptSwap(i, k);
                      iteration++;
    
                      var newDistance = _newTour.TourDistance();
    
                      if (!(newDistance < bestDistance)) continue;
    
                      // Improvement found so reset
                      improve = 0;
    
                      for (var j = 0; j < size; j++)
                      {
                         _tour.SetCity(j, _newTour.GetCity(j));
                      }
    
                      bestDistance = newDistance;
    
                      // Update the display
                      SetTourCoords();
    
                      TourUpdated.Raise(this, new Tuple<double, int>( bestDistance, iteration));
                   }
                }
    
                improve++;
             }         
          }
    

    And this is how the swap is done:

    private void TwoOptSwap(int i, int k)
          {
             var size = _tour.TourSize();
    
             // 1. take route[0] to route[i-1] and add them in order to new_route
             for (var c = 0; c <= i - 1; ++c)
             {
                _newTour.SetCity(c, _tour.GetCity(c));
             }
    
             // 2. take route[i] to route[k] and add them in reverse order to new_route
             var dec = 0;
             for (var c = i; c <= k; ++c)
             {
                _newTour.SetCity(c, _tour.GetCity(k - dec));
                dec++;
             }
    
             // 3. take route[k+1] to end and add them in order to new_route
             for (var c = k + 1; c < size; ++c)
             {
                _newTour.SetCity(c, _tour.GetCity(c));
             }
          }
    

    Trying out the program
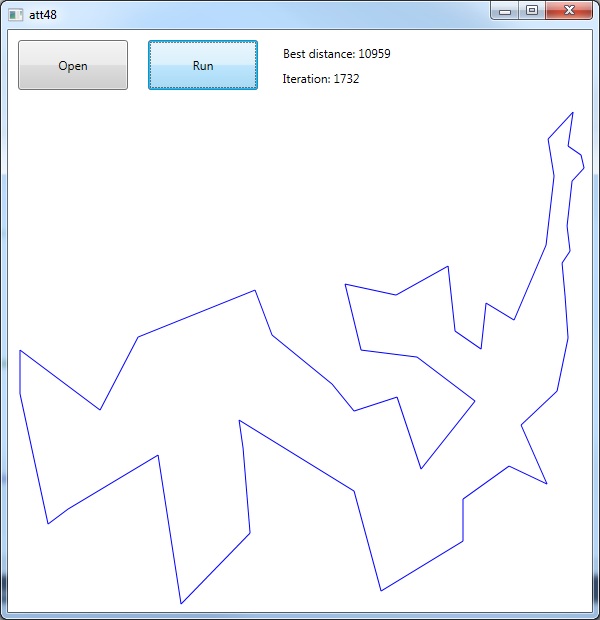
    Att48.tsp

    I tend to always start out on a reasonably small test problem such as att48.tsp, available from here:

    http://elib.zib.de/pub/mp-testdata/tsp/tsplib/tsp/att48.tsp

    Click the Open button and navigate to the Att48.tsp test problem when prompted, which plots the city locations as a series of nodes:

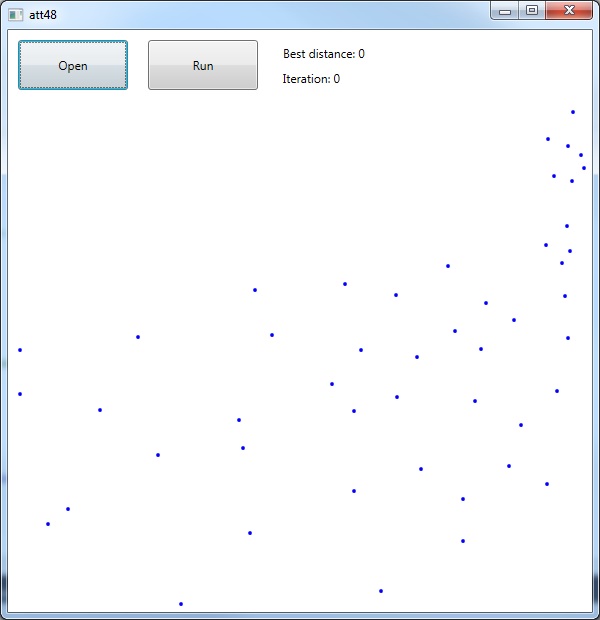
    Upon pressing Run, we obtain the solution of length 10959:

    kroA200.tsp

    I then try out the program on a larger problem with 200 nodes, “kroA200.tsp”, available from here:

    http://elib.zib.de/pub/mp-testdata/tsp/tsplib/tsp/kroA200.tsp

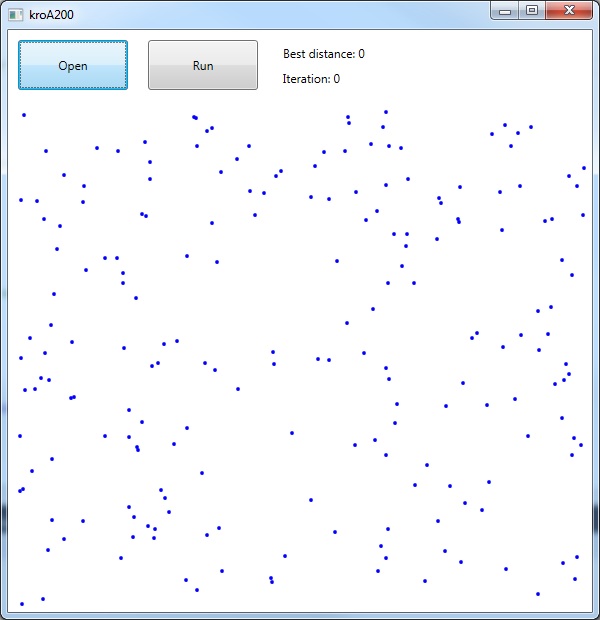
    Giving the following result:
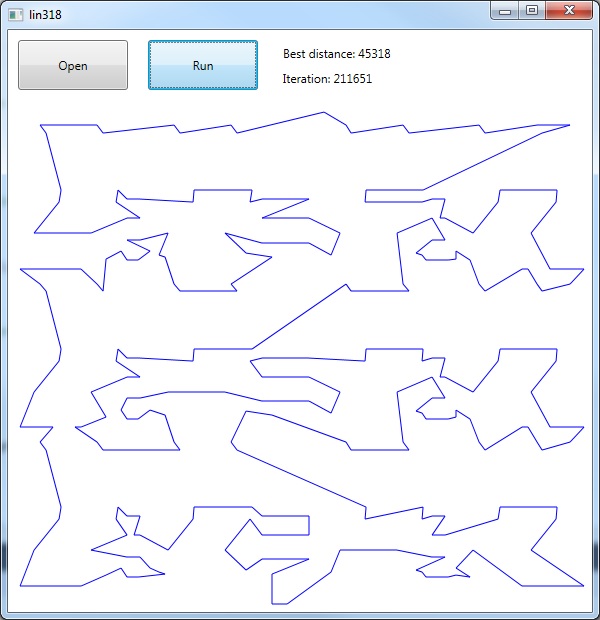
    lin318.tsp

    Finally I try one more test problem, “lin318.tsp”, available from here:

    http://elib.zib.de/pub/mp-testdata/tsp/tsplib/tsp/lin318.tsp
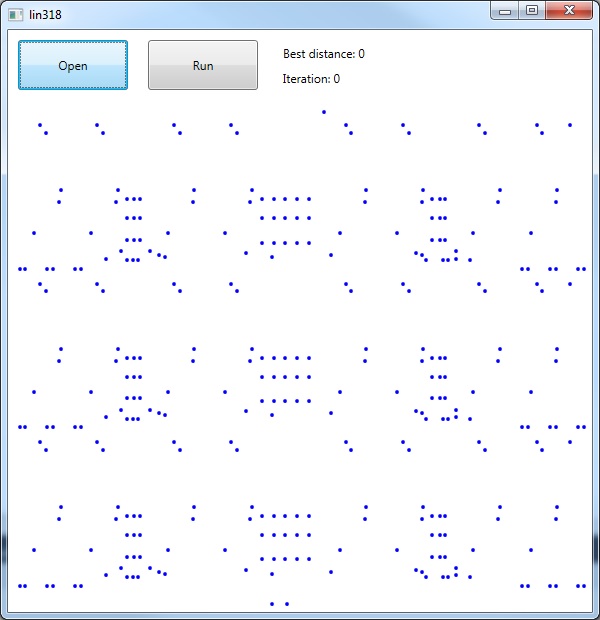
    Results as shown:

    Full code sample in the form of a Visual Studio 2015 project is available from here:


  • Using the HTML Agility Package to modify web pages

    Step 1: Create a new Visual Studio project

    Create a new Console application:

    Step 2: Use the Package Manager console to install the HTML Agility package.

    Select Tools > NuGet Package Manager > Package Manager Consol

    Enter: Install-Package HtmlAgilityPack

    Step 3: Add the reference to the HtmlAgilityPack.dll

    Right click you References folder, and browse to the HtmlAgilityPack.dll file that gets installed to the ‘packages’ folder in your Visual Studio project.

    Select and add this file:

    Step 4: Try it on some examples

    1. Insert the ‘DOCTYPE’ comment before the main tag and insert a “

  • Using the CefSharp Chromium Web Browser in WPF / XAML

    Some brief instructions on getting started with using the Chromium Web Browser in WPF.

    Step 1: Create a new WPF project

    cefsharpbrowser

    Step 2: Obtain the CefSharp packages using NuGet

    Link for the NuGet packages is here:

    https://www.nuget.org/packages/CefSharp.WPF/

    Select Tool > NuGet Package manager > Package Manager Console.

    Use the

    PM> install-package CefSharp.Wpf

    Step 3: add the CefSharp dll references

    Right-click on References, select ‘Add reference’

    When the dialog appears, select the Browse button. Navigate to the ‘packages’ folder that NuGet has installed to your Visual Studio project. For this project I’m choosing the x86 versions…

    Add CefSharp.Wpf.dll:

    cefsharpbrowser1

    Add the CefSharp.dll, CefSharp.Core.dll, CefSharp.BrowserSubprocessCore.dll:

    cefsharpbrowser2

    If you get the error similar to the following:

    Error	1	CefSharp.Common will work out of the box if you specify platform (x86 / x64). For AnyCPU Support see https://github.com/cefsharp/CefSharp/issues/1714	CefSharpBrowser
    

    … make sure you have set the Configuration Manager is set to either x86 or x64 – NOT ‘Any CPU’ otherwise it will never work.

    cefsharpbrowser3

    Step 4: Update the MainWindow.xaml to embed the ChromiumWebBrowser control:

    Namely, a reference to the CefSharp.Wpf namespace and the ChromiumBrowserControl itself.

    MainWindow.xaml

    <Window x:Class="CefSharpBrowser.MainWindow"
            xmlns="http://schemas.microsoft.com/winfx/2006/xaml/presentation"
            xmlns:x="http://schemas.microsoft.com/winfx/2006/xaml"
            xmlns:wpf="clr-namespace:CefSharp.Wpf;assembly=CefSharp.Wpf"
            Title="MainWindow" 
            Height="350" Width="525">
        
        <Grid>
            <wpf:ChromiumWebBrowser 
                x:Name="Browser"
                Address="http://www.google.co.uk" />
        </Grid>
    </Window>
    

    The re-build your project. You may have to close and re-open your MainWindow.xaml file to get it to update and display correctly. When run the browser control appears embedded in the WPF application and navigates to the web address pointed to by the ChromiumWebBrowser ‘Address’ property, as shown:

    cefsharpbrowser4

    Known issues

    The most recent version of CefSharp (version 53.0.0) does not seem to browse PDF documents so well. If this is an issue for you, uninstall this version (by using the NuGet package manager) and install an earlier version instead:

    First un-install the newer packages:

    PM> uninstall-package CefSharp.Wpf
    PM> uninstall-package CefSharp.Common
    PM> uninstall-package cef.redist.x64
    PM> uninstall-package cef.redist.x64
    

    Then remove the existing references: right click the References folder, and select to remove CefSharp.Wpf, CefSharp.Core etc.

    And then install the older version:. Just the following command is sufficient to install everything:

    PM> install-package CefSharp.Wpf -version 39.0.0
    

    So that the list of packages now becomes:

    <?xml version="1.0" encoding="utf-8"?>
    <packages>
      <package id="cef.redist.x64" version="3.2171.2069" targetFramework="net452" />
      <package id="cef.redist.x86" version="3.2171.2069" targetFramework="net452" />
      <package id="CefSharp.Common" version="39.0.0" targetFramework="net452" />
      <package id="CefSharp.Wpf" version="39.0.0" targetFramework="net452" />
    </packages>
    

    As before, add the updates dll references to the project, but this time from the 39.0.0 folder:

    cefsharpbrowser5

    cefsharpbrowser6

    Try wiring the ‘Address’ property to an example PDF location, such as

    <Grid>
            <wpf:ChromiumWebBrowser 
                x:Name="Browser"
                Address="http://www.pdf995.com/samples/pdf.pdf" />
        </Grid>
    

    The application will then successfully browse PDF files as shown:

    cefsharpbrowser7

  • How to run processes and obtain the output in C#

    Example process: fsutil.

    Very useful link on obtaining and setting fsutil behaviour and properties at this following link:

    http://blogs.microsoft.co.il/skepper/2014/07/16/symbolic_link/

    Typically contained in the System32 folder: C:\Windows\System32

    It is quite simple to do and consists of two main steps:

    Step 1: Create Process object and set its StartInfo object accordingly

    var process = new Process
    {
    	StartInfo = new ProcessStartInfo
    	{
    		FileName = "C:\\Windows\\System32\\fsutil.exe",
    		Arguments = "behavior query SymlinkEvaluation",
    		UseShellExecute = false, RedirectStandardOutput = true,
    		CreateNoWindow = true
    	}
    };
    

    Step 2: Start the process and read each line obtained from it:

    process.Start();
    
    while (!process.StandardOutput.EndOfStream)
    {
    	var line = process.StandardOutput.ReadLine();
    	Console.WriteLine(line);
    }
    

    Full Code listing:

    using System;
    using System.Diagnostics;
    
    namespace RunProcess
    {
        internal class Program
        {
            private static void Main(string[] args)
            {
                try
                {
                    var process = new Process
                    {
                        StartInfo = new ProcessStartInfo
                        {
                            FileName = "C:\\Windows\\System32\\fsutil.exe",
                            Arguments = "behavior query SymlinkEvaluation",
                            UseShellExecute = false, RedirectStandardOutput = true,
                            CreateNoWindow = true
                        }
                    };
    
                    process.Start();
    
                    while (!process.StandardOutput.EndOfStream)
                    {
                        var line = process.StandardOutput.ReadLine();
                        Console.WriteLine(line);
                    }
    
                    process.WaitForExit();
                }
                catch (Exception e)
                {
                    Console.WriteLine(e.Message);
                }
            }
        }
    }
    

    For our example I wanted to see what the SymbolicLinkStatus was for remote -> local etc:

    Console output as follows:

    fsutil

  • Using the Gecko Web Browser in a C# Winforms Project

    Some particularly useful links:

    http://stackoverflow.com/questions/8778320/how-to-use-gecko-in-c-sharp
    https://xinyustudio.wordpress.com/2015/07/04/embedding-web-browsers-in-winform-applications/#more-3695

    See this link if you’re interested in using Gecko in a WPF project:

    https://www.technical-recipes.com/2017/using-the-gecko-web-browser-in-wpf/

    Installing and using the latest GeckoFX-45.0

    1. Create a new WinForms application:

    gecko45_1

    2. Install the GeckoFX package via NuGet

    Select Tools > NuGet Package Manager > Package Manager Console

    gecko45_2

    At the Package Manager Console type ‘install-package geckofx45’:

    gecko45_3

    3. Insert the Gecko control into your form.

    Select View > ToolBox and the new control should now be available:

    gecko45_4

    If this tool does not appear then right click on the ‘General’ tab of the Toolbox and select ‘Choose items…’. The go to the COM Components tab and select the Browse button and locate and select the Geck winforms-related dll (‘Geckofx-Winforms.dll’) that would have been installed inside the ‘packages’ folder of your Visual Studio project. Then it should appear.
    Drag, drop and resize this into your form.

    gecko45_5

    4. Update the code and run it

    using System.Windows.Forms;
    using Gecko;
     
    namespace GeckoBrowser
    {
       public partial class Form1 : Form
       {
          public Form1()
          {
             Initialize Component();
             Xpcom.Initialize("Firefox");
             geckoWebBrowser1.Navigate("www.bbc.com");
          }
       }
    }
    

    gecko45_6

    Older versions (pre geckofx-45)

    Step 1: Create a new Visual Studio project: a Windows Forms Application

    gecko1

    Step 2: Download and extract pre-requisites

    Download the pre-requisites needed to implement the Gecko web browser. You will need GeckoFX AND XULRunner.
    At the time of writing, I choose:

    GeckoFX-33.0

    https://bitbucket.org/geckofx/geckofx-33.0/downloads

    Extract the zip file and copy the dll files to the bin/ folder of your Visual Studio project as shown:

    gecko2

    XULRunner 33.1

    https://ftp.mozilla.org/pub/xulrunner/releases/33.0/runtimes/

    Extract the zip file and move/copy the entire xulrunner/ sub-folder (it is contained inside the extracted folder) to the bin/ directory as shown:

    gecko3

    Step 3: Configure References

    Add the references to your Visual Studio project. Right-click the References section and select Add Reference…

    gecko4

    Select the Browse button and locate the 2 x dll files in your Visual Studio project bin/ folder:

    gecko5

    Click Add and then click OK.

    Step 4: Update the Toolbox

    Now add the Items to your toolbox. Select View > Toolbox. Right-click underneath the General tab and select Choose Items…

    gecko6

    Let it finish loading items, if necessary.

    Select the Browse button and select the Winforms dll:

    gecko7

    Click OK on the ‘Choose Toolbox Items’ dialog.

    Your Toolbox should now have the ‘GeckoWebBrowser’ tool added:

    gecko8

    Step 5: Update your WinForms code

    Select this GeckoWebBrowser tool and use it to drag-and-drop the tool on to your WinForms control:

    gecko9

    Right-click on the Form1 dialog and select Properties.

    Use the Properties > Events tab to create the event handler for the ‘Load’ event:

    gecko10

    Go to the Form1.cs file and update the .cs code to handle the ‘Load’ event.

    Update Form1 constructor to run Initialise function, setting it with the relative path to the xulrunner sub-folder we installed earlier:

    using System;
    using System.Windows.Forms;
    
    namespace GeckoExample
    {
       public partial class Form1 : Form
       {
          public Form1()
          {
             InitializeComponent();
             Gecko.Xpcom.Initialize(@"..\..\xulrunner");
          }
    
          private void Form1_Load(object sender, EventArgs e)
          {
             geckoWebBrowser1.Navigate("bbc.com");
          }
       }
    }
    

    Step 6: Build, configure and run

    Build your project. Notice the following build error I got on my x64 machine:

    1>------ Rebuild All started: Project: GeckoExample, Configuration: Debug Any CPU ------
    1>C:\Program Files (x86)\MSBuild\12.0\bin\Microsoft.Common.CurrentVersion.targets(1697,5): warning MSB3270: There was a mismatch between the processor architecture of the project being built "MSIL" and the processor architecture of the reference "Geckofx-Core", "x86". This mismatch may cause runtime failures. Please consider changing the targeted processor architecture of your project through the Configuration Manager so as to align the processor architectures between your project and references, or take a dependency on references with a processor architecture that matches the targeted processor architecture of your project.
    1>  GeckoExample -> E:\CodeSamples\GeckoExample\GeckoExample\bin\Debug\GeckoExample.exe
    ========== Rebuild All: 1 succeeded, 0 failed, 0 skipped ==========
    

    If you need to deal with this problems then update the Configuration Manager to deal with this mismatch:

    gecko11

    Setting it as follows:

    gecko12

    So it becomes:

    gecko13

    Now rebuild and run your application. It can sometimes take a few moments for the actual web page to materialize. Example output as shown:

    gecko14

  • Getting started with Spire.XLS for .NET

    E-iceblue Ltd. is a vendor of powerful components for .NET, Silverlight and WPF development. These products enable the user to easily read and write different formats of office files.

    A quick an easy guide to setting up Spire.XLS for use in Visual Studio .NET projects is presented here.

    For the purpose of clarity and helping the user get started as soon as possible, a simple ‘HelloWorld’ example is presented.
    (more…)

  • Converting a SYSTEMTIME to a std::string in C++

    A short recipe outlining how to output a SYSTEMTIME value as a std::string.

    The example format will be “YYYY-MM-DD HH:MM:SS.MMM”

    I specifically wanted to include milliseconds.

    In this example I employ three possible techniques:

    1. MFC CString
    2. std::ostringstream
    3. sprintf
    (more…)